Momentan wird die Anleitung ins Deutsche übersetzt. Bis dahin ist sie teilweise auf Englisch verfügbar.
Diese Anleitung hat das Ziel, das Courseplay-HUD, die verschiedenen Einstellungen und die verschiedenen Fahrmodi zu erklären. Mit aller Wahrscheinlichkeit werden ein oder zwei Sachen fehlen.
Wenn du ein Thema findest das nicht in dieser Anleitung behandelt wird, lass es uns wissen.
Bedienung
Die Steuerung funktioniert im wesentlichem mit der Maus, da freie Tasten im Landwirtschafts Simulator ja sehr rar sind. Mit einem Klick der rechten Maustaste aktiviert ihr das Courseplay-Fenster, in dem ihr den jeweiligen Fahrer konfigurieren könnt. Zusätzlich sind einige Funktionen wie Abfahrer starten und stoppen auch über die Tastatur über die Tasten STRG+NUM 7 bis STRG+NUM 9 belegt. Im HUD kann das Öffnen/Schließen auch auf die Tastatur gelegt werden (Standardeinstellung: STRG+ENTF).
Die Maus- und Tastaturtasten können auch im Spieloptionsmenü gesetzt werden.
HUD
Wenn ihr das HUD öffnet, wird automatisch die Maussteuerung aktiviert. Das heißt, ihr könnt euch mit der Maus nicht mehr umgucken. Um die Maussteuerung zu deaktivieren, müsst ihr einfach nochmal auf die rechte Maustaste klicken. Alternativ könnt ihr auch auf das oben rechts im HUD klicken. Dabei wird das HUD geschlossen und die Maussteuerung wieder deaktiviert.
Das HUD ist in mehrere Unterseiten unterteilt. Durch diese könnt ihr mit den jeweiligen Buttons am oberen Rand navigieren. Die Seitentitel werden als Tooltip angezeigt. Dabei ist zu beachten dass bestimmte Seiten deaktiviert sind wenn man in einem bestimmten Modus oder Fahrzeug ist.
Im mittleren Bereich des HUDs könnt ihr auf jeder Unterseite verschiedene Einstellungen vornehmen oder Befehle geben. Klickt dazu einfach auf die gewünschte Aktion bzw. die entsprechenden Buttons (/////). Bestimmte Werte oder Einstellungen wie das Durchblättern der Kurse, oder das Einstellen von Breiten, Geschwindigkeiten oder Prozentzahlen etc. können durch drücken der STRG-Taste in größeren Schritten verändert werden. Bestimmte Werte und Bereiche (wie die Kursliste) können auch mit dem Mausrad durchgescrollt werden. Dies wird durch ein Mausrad-Icon neben dem Mauszeiger angezeigt.
Im unteren Bereich des HUDs findet ihr Infos über euren Abfahrer, den geladenen Kurs und den aktuellen Status.
HUD: Drescher steuern
Diese Seite wird nur bei Dreschern, Häckslern, Ernter und Traktoren mit angehängten Erntern angezeigt.
Abfahrer rufen/gerufen
Einen Abfahrer manuell rufen, so dass er den Drescher entlädt. Wenn ein Abfahrer den Drescher erkannt hat und anfährt, wird dessen Name angezeigt.
Abfahrer stoppen/starten
Den aktuellen Abfahrer manuell anhalten oder wieder starten.
Abfahrer wegschicken
Den aktuellen Abfahrer manuell auf seinen Kurs schicken. Dieser fährt den dann ab, entlädt/überlädt und kommt zu seinem ersten Wegpunkt zurück.
Abfahrerseite
Wird nur bei Häckslern angezeigt.
Standardmäßig suchen sich die Abfahrer automatisch die richtige (Nicht-Frucht-) Seite zum Fahren neben dem Häcksler. Mit dieser Funktion kann eine feste Seite festgelegt werden (z.B. wenn man manuell das Feld im Kreis abfährt).
Abfahrer-Priorität
Wird nur für Drescher und Ernter (nicht Häcksler) angezeigt.
Wenn mehrere Abfahrer einen Drescher oder Ernter abtanken sollen, definiert diese Option mit welcher Priorität die Abfahrer gerufen werden.
Füllstand: der Abfahrer mit dem höchsten Füllstand wird zuerst gerufen - unabhängig von der Distanz zu dem Drescher.
Distanz: der Abfahrer der dem Drescher am nächsten ist wird zuerst gerufen - unabhängig des eigenen Füllstands.
Wendemaneuver
Wird nur für Häcksler die manuell gesteuert werden (d.h. nicht als Helfer oder per Courseplay) angezeigt.
Sendet ein Signal an den Abfahrer dass der Häcksler nun das Wendemaneuver beginnt. Der Abfahrer wird aus dem Weg fahren und selber anfangen zu wenden. Ein nochmaliger Klick bewirkt dass der Abfahrer zurückkommt an die Seite kommt und wieder ablädt.
Während dem Abladen anhalten
Wird nur für Drescher und Ernter (nicht Häcksler) im Feldarbeitsmodus angezeigt
Wenn diese Option aktiviert ist wird der Drescher während des Abladens anhalten.
HUD: Abfahrhelfer Steuerung
Kein Kurs geladen
Kursaufzeichnung beginnen
Mit dieser Option wird der Aufnahmemodus aktiviert. Ihr könnt damit den Kurs einfahren den der Abfahrer später fahren soll. Während der Aufnahme könnte ihr die Maussteuerung durch einen Rechtsklick deaktivieren so dass ihr die Kamera steuern könnt.
Wenn man auf einem Feld steht kann die Feldgrenze gescannt werden. Sie wird dann als blaue Linie mit gelben Punkten angezeigt (kann per an- und ausgeschaltet werden).
Wenn du diese Feldgrenze speichern möchtest, wähle eine Feldnummer für sie per /. Wenn eine Feldgrenze mit dieser Nummer schon existiert, kann sie überschrieben werden. Ansonsten kann die neue Feldgrenze der Liste hinzugefügt werden.
Jedes manuell gescannte und abgespeicherte Feld wird in der courseplayFields.xml Datei gespeichert und mit dem Savegame wieder geladen.
Aufzeichnungsmodus
Während der Kursaufzeichnung wird jeder neu erstellte Wegpunkt durch ein orangenes Pyramidensymbol angezeigt. Mehrere Knöpfe ermöglichen die Einstellung der Wegpunkte bzw. Aufzeichnung. Die Funktionen der Knöpfe werden als Tooltip angezeigt.
Ihr solltet sicher gehen dass bis zum dritten Wegpunkt eine relativ gerade gefahren wird.
The aufgenommene Kurs ist nur temporär: wenn du das nächste mal das Savegame lädst wird er nicht mehr existieren - es sei denn du speicherst ihn. (Siehe: Kursverwaltung)
Aufnahme beenden
Wenn ihr den Endpunkt eurer eingefahrenen Route erreicht habt, beendet diese Option die Aufnahme. Es empfiehlt sich, dass der Endpunkt etwa 5-10 Meter vor dem Startpunkt liegt und dass man grob aus der Richtung kommt, in die der Abfahrer beim Startpunkt auch weiterfahren soll.
Aufnahme pausieren/fortsetzen
Diese Option pausiert die aktuelle Aufzeichnung bzw. setzt sie fort. Es wird ein gelber Pfeil angezeigt, der die Richtung zum letzten Wegpunkt zeigt. Zusätzlich könnt ihr in diesem Modus auch den jeweils letzten Wegpunkt löschen (siehe "Letzten Wegpunkt löschen"). Wenn pausiert, wird der Button in grün angezeigt.
Letzten Wegpunkt löschen
Diese Option ist nur verfügbar wenn die Aufnahme pausiert ist. Der aktuell letzte Wegpunkt wird gelöscht. Du kannst das wiederholen bis nur noch 3 Wegpunkte existieren.
Wartepunkt setzen
Diese Option erstellt einen Wartepunkt an der aktuellen Position. An diesen Punkten wird der Fahrer, während dem Abfahren des Kurses, anhalten und warten bis du ihm entweder sagst weiterzufahren, oder bis die eingestellte Wartezeit vorrüber ist. Wenn ein Fahrer einen Wartepunkt erreicht hat wird eine Infonachricht angezeigt (XYZ hat Wartepunkt erreicht.).
In bestimmten Modi haben Wartepunkte eine spezielle Bedeutung: in den Düngen/Säen und Feldarbeit Modi repräsentieren sie den Anfang und das Ende des Arbeitsbereichs, oder - wenn ein Ballenlader benutzt wird - den Abladepunkt. Im Schaufel befüllen und entleeren Modus repräsentieren sie den Anfang und das Ende des Ladebereichs, und den Abladepunkt.
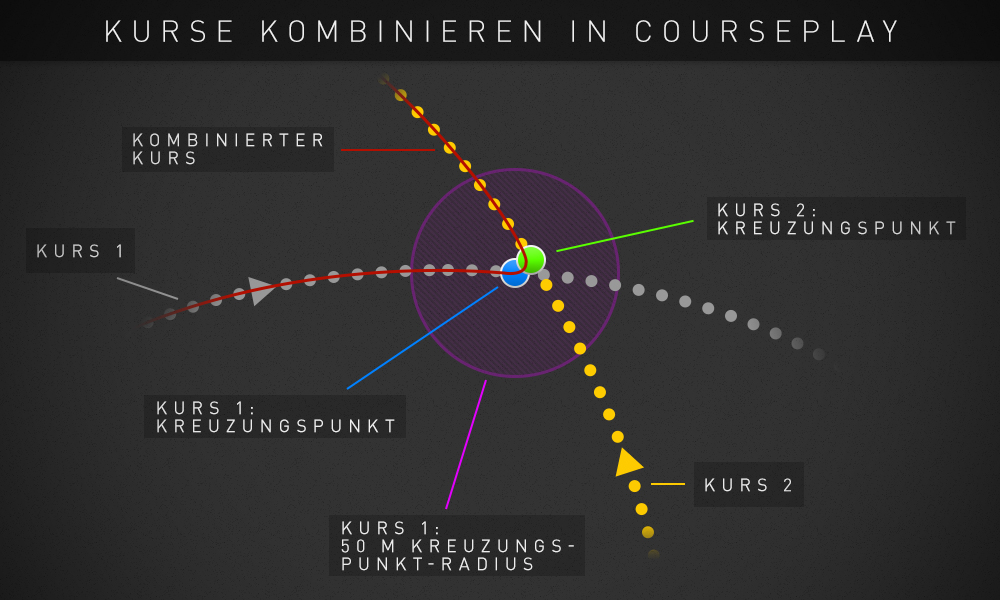
Kreuzungspunkt setzen
Kreuzungspunkte sind "Signal-" oder "Kombinationspunkte", an denen verschiedene Kurse kombiniert werden können (siehe Kurse verwalten). Hierbei werden dann bei den beiden Kursen die ersten zwei Kreuzungspunkte gesucht, die weniger als 50m voneinander entfernt sind. Der kombinierte Kurs wird dann den ersten Kurs bis zu dem Kreuzungspunkt, und ab dort den zweiten Kurs ab dessen Kreuzungspunkt sein.
Kombinierung von zwei Kursen an ihren Kreuzungspunkten
Hinweis: Start- und Endpunkte von Kursen sind immer automatisch Kreuzungspunkte, müssen also nicht extra als solche deklariert werden.
Wendemaneuver beginnen/beenden
Während es sich generell empfiehlt, Feldkurse generieren zu lassen, kann man diese auf manuell aufzeichnen. Durch das Deklarieren der Wendemaneuver-Punkte wird der Fahrer später beim Abfahren hier das Wenden einleiten und ausführen - sprich: Gerät ausheben und/oder abschalten. Der erste Klick aktiviert das Wendemaneuver (der Button wird in grün angezeigt), ein erneuter Klick beendet es.
Rückwärtsfahren beginnen/beenden
Courseplay unterstützt das Rückwärtsfahren mit Anhängern in verschiedenen Modi. Durch das Aktivieren der Rückwärts-Fahren-Option wird der Abfahrer später diese Sektion des Kurses rückwärts fahren. Du solltest es erst (de-)aktiviern wenn das Fahrzeug gänzlich still steht und nicht mehr rollt. Wenn es aktiviert ist, musst du rückwärts fahren, ansonsten wird es später schwere Fahrfehler geben. Ein erster Klick aktiviert den Rückwärts-Modus (der Button wird in grün angezeigt), ein erneuter Klick beendet ihn.
Wenn ihr einen Kurs eingefahren oder geladen habt, könnt ihr jetzt den Abfahrer einstellen. Dabei wird der Abfahrhelfer aktiviert und fährt seine Route ab. Die manuelle Steuerung des Schleppers wird dadurch deaktiviert, bis der Fahrer wieder entlassen wird.
Kurs beginnen am…
Verfügbar in allen Modi außer "Schaufel befüllen und entleeren"
Manche bestimmte Kurse haben relativ viele Punkte in einem kleinen Bereich, gerade am Startpunkt (z.B. generierte Kurse mit Vorgewende). Hier kann ausgewählt werden ob der Kurs am nächstgelegenen Punkt (Standardeinstellung), am aktuell eingestellten oder fest am ersten Punkt begonnen werden soll.
Mit dieser Option kann der Fruchttyp, der an einem Silo am Startpunkt geladen werden soll, selektiert werden. Jeder Traktor kann einen anderen eingestellten Fruchttyp haben, was gleichzeitig unterschiedliche Routen vom selben Silo aus ermöglicht. Diese Einstellung wird in der vehicles.xml Datei gespeichert.
Modus wechseln
Um verschiedenste Arbeiten erledigen zu können, gibt es verschiedene Arbeitsmodi. Bestimmte Modi sind nur für bestimmte Fahrzeugtypen verfügbar. Zum Beispiel kann ein Traktor nicht den Drescher-selbst-abtanken Modus benutzen. Der aktuelle Modus wird in grün angezeigt. Die Modusnamen werden als Tooltip beim Hovern angezeigt.
Die verschiedenen Modi werden im Detail in der Fahrmodi-Sektion beschrieben.
Wegpunkte löschen
Wenn ein Kurs aufgezeichnet oder geladen wurde, kann man mit dieser Option die aktuellen Wegpunkte verwerfen. The gespeicherte Kurs wird dabei nicht aus dem Savegame gelöscht.
Nach erstem Wegpunkt suchen
Wenn diese Option aktiviert ist, wird die Richtung und Distanz zum ersten Wegpunkt des aktuellen Kurses angezeigt (in Relation zum Traktor). Dies kann nützlich sein wenn man sich nicht daran erinnern kann wo der Start des Kurses ist.
Kurs geladen, Fahrer aktiv
Abfahrer stoppen
Natürlich kann man den Fahrer jederzeit stoppen. Wenn man ihn wieder aktiviert, startet er an dem nächsten Wegpunkt (je nach Kurs beginnen am Einstellung).
Sofort abfahren
Wenn man einen "Füll"-Kurs fahren lässt – zum Beispiel beim Abladen eines Dreschers im Combi-Modus, oder beim Gras-Sammeln im Feldarbeitsmodus – kann man mit dieser Option den Fahrer sofort auf seinen Abladekurs schicken.
Weiterfahren
Wenn ein Fahrer einen Wartepunkt erreicht hat und wartet, lässt ihn diese Option weiterfahren.
Warten am letzten Wegpunkt oder Trigger
Wenn diese Option aktiviert ist, wird der Fahrer am nächsten Abladetrigger oder Fülltrigger, oder – wenn nicht vorhanden – am Ende des Kurses warten.
Spurreißer
Nur verfügbar im Düngen und Säen Modus und wenn eine Saatmaschine angehängt ist.
Wenn eine Saatmaschine mit einem generierten Kurs benutzt wird, lässt diese Option auswählen ob die Spurreißer automatisch oder manuell gesetzt werden sollen. Diese Einstellung wird in der vehicles.xml Datei gespeichert.
Abladen auf dem Feld
Nur verfügbar im Feldarbeitsmodus, wenn ein Ballenlader angehängt ist und kein Abladekurs nach dem Feldarbeitskurs existiert
Ist diese Option aktiviert wird der Ballenlader automatisch auf dem Feld abladen wenn er 100% voll ist.
HUD: Kurse verwalten
Auf dieser Seite findest du eine Übersicht deiner gespeicherten Kurse und Ordner. Die Liste kann mit den Pfeilen (/) an der rechten Seite und dem Mausrad gescrollt werden.
Das Kurs-Management-System funktioniert grundlegend wie ein reguläres Dateisystem. Man kann Ordner erstellen, Kurse und andere Ordner in diese verschieben, Kurse laden und löschen. The Kurse und Ordner werden in der courseplay.xml Datei gespeichert.
Standard-Änderung
8 Zeilen (Mausrad: 1 Zeile)
STRG-Änderung
16 Zeilen (Mausrad: 8 Zeilen)
Generelle Aktionen
Wegpunkte löschen
Um einen neuen Kurs aufzunehmen oder zu laden, müssen die aktuellen Wegpunkte mit dieser Option erst einmal entfernt werden. Der Kurs wird dabei nicht vom Savegame gelösct, sondern nur der jeweilige Fahrer wird seine aktuellen Wegpunkte löschen.
Nach Kursen und Ordnern suchen
Diese Option erm;glicht es, die Kurs- und Ordnerliste zu filtern. Ein kleines Fenster öffnet sich wo man den Suchbegriff eingeben kann. Wenn der Filter aktiv ist, kann man ihn per Klick auf den Abbrechen-Button () beenden.
Neuen Ordner erstellen
Kreiert einen neuen Ordner auf der Hauptebene. Ein kleines Fenster öffnet sich wo man den Ordnernamen eingeben kann.
Kurs speichern
Speichert den aktuell aktiven Kurs als neuen Kurs im Dateisystem. Ein kleines Fenster öffnet sich wo man den Kursnamen eingeben kann.
Kursaktionen
Kurs laden/mit aktuellem Kurs zusammenfügen
Den gewählten Kurs laden. Wenn schon ein Kurs geladen ist, wird der neue Kurs mit dem existierenden am ersten gemeinsamen Kreuzungspunktbereich zusammengefügt. In den Kursen werden zwei Kreuzungspunkte (jeweils einer in jeden Kurs) die näher als 50m zueinander sind gesucht. Der kombinierte Kurs wird bis zum Kreuzungspunkt des ersten Kurses gehen, von dort zum Kreuzungspunkt des zweiten Kurses und von dort den zweiten Kurs weiter.
Kombinierung von zwei Kursen an ihren Kreuzungspunkten
Kurs anhängen
Ist schon ein Kurs geladen wird der gewählte Kurs ans Ende angehängt. Ansonsten wird er regulär geladen.
Kurs/Ordner löschen
Der Kurs/Ordner wird komplett aus Courseplay und dem Savegame gelöscht. Er wird beim nächsten Savegame-Start nicht mehr zu Verfügung stehen. Ordner können nur gelöscht werden wenn sie keine anderen Ordner und/oder Kurse enthalten.
In Ordner verschieben
Der Kurs (oder Ordner) wird in den danach ausgewählten Ordner veschoben.
HUD: Einstellungen Combi Modus
Diese Seite ist in allen Modi außer "Überführung", "Feldarbeit" und "Schaufel befüllen und entleeren" verfügbar.
Wie der Name schon sagt sind diese Einstellungen hauptsächlich für die Combi- und Überlademodi. Hier werden Abtankeinstellunge feinjustiert. Zusätzlich gibt es noch eine Option für die "Düngen/Säen" und "Gülletransport"-Modi. Die Werte können per Klick auf die / Knöpfe oder per Mausrad verändert werden (in größeren Schritten wenn STRG gedrückt ist).
Seitlicher Abstand
Dieser Wert definiert den seitlichen Abstand, den ein Abfahrer zum Drescher oder Häcksler beim Nebenherfahren einhalten soll. Standardmäßig ist "auto" eingestellt - damit passt sich der seitliche Abstand automatisch an den Drescher oder Häcksler an. Durch und kann der Wert verstellt und auf "manuell" gesetzt werden. Zurücksetzen auf Automatik durch Setzen auf 0 (null).
Standard-Änderung
0.1m
STRG-Änderung
0.5m
Vertikaler Abstand
Dieser Wert legt den vertikalen Versatz zum Schlepper an (vor/zurück). Dies wird benutzt um den Hänger direkt unter die Pipe zu bekommen. Der Wert ist standardmäßig auf "auto". Anders als beim seitlichen Abstand oder Wendekreis wird per / auf den automatischen Wert heraufgerechnet / davon abgezogen (sprich: z.B. 1m vor/zurück). Zurücksetzen auf Automatik durch Setzen auf 0 (null).
Standard-Änderung
0.1m
STRG-Änderung
0.5m
Wendekreis
Dieser Wert legt den Wendekreis des Schleppers fest. Dies wird v.a. für die Wendemanöver beim Drescher/Häcksler abtanken benötigt. Der Wert wird, wie beim seitlichen Abstand, standardmäßig automatisch berechnet sobald man einen Kurs abfährt. Die Automatische berechnung bezieht den Wendekreis der angehängten Geräte mit ein. Auch kann der Wert via / verändert und auf manuell gesetzt werden. Zurücksetzen auf Automatik durch Setzen auf 0 (null).
Standard-Änderung
1m
STRG-Änderung
5m
Start bei %
Dieser Wert legt fest, ab welchem Füllstand des Dreschers der Abfahrer zu ihm fährt und ihn abtankt. Bei Häckslern wird durch diesen Wert festgelegt, ab wann der zweite Abfahrer in der Kette dem Ersten hinterherfahren soll.
Info: wenn Fruchtumfahrung aktiviert ist, wird dieser Wert ignoriert solange die Pipe des Dreschers in der Frucht und der Drescher nicht voll ist.
Standard-Änderung
5%
STRG-Änderung
10%
Abfahren bei %
Dieser Wert legt fest, ab welchem Füllstand des Hängers der Fahrer den Abladekurs fahren soll. Dies kann z.B. praktisch sein, wenn der Hänger zu 97% voll ist und der Abfahrer nicht noch 5 Minuten warten soll.
Standard-Änderung
5%
STRG-Änderung
10%
Auffüllen bis %
Nur in den "Düngen/Säen" und "Gülletransport" Modi verfügbar.
Dieser Wert definiert die Menge die ein Gerät am Fülltrigger auffüllen soll.
Standard-Änderung
1%
STRG-Änderung
5%
HUD: Manage combines
This page is displayed only in the "combi" and "overloader" modes.
These settings are only relevant for the combi and overloader modes. You can choose between the driver looking for a combine in need automatically (the default setting), or have an assigned, non-changing combine (manual). If the driver looks for combines automatically, it has to be on the same field as the combine in order to find it. If the driver has been assigned manually to a combine, it can be outside of the field area not. The driver drives from his start point to the combine, no matter where it is.
This can be useful for big and hilly fields where the automatic assignment doesn't always work. Or for areas which aren't fields, like meadows.
HUD: Speeds
Here you can set how fast your driver should drive. Also, you can choose if a course should be driven with the speed used during the recording, or the maximum speed.
Switching Speed: from recording and Speed: maximum speed determines if the speed used during the recording or the set maximum speed should be used.
Note: the unloading speed is also used for reversing.
Default change
1 kph / 0.6 mph
CTRL change
5 kph / 3.1 mph
HUD: General settings
Path finding
Only available in "combi" and "overload" modes
When activated, the driver tries as best as possible not to drive through the fruit. On the one hand this means that on the way to the combine/chopper he drives around the fruit. On the other hand it means that he won't drive to unload a combine if the combine's pipe is on the fruit side. The driver will only start if either the pipe is on the non-fruit side, or the combine is 100% full (ignoring the Start at % setting).
At the moment, the "driving around the fruit" part of this option is deactivated, as we're reworking it completely. We plan to reimplement it in the next release.
Open Courseplay
You can choose if the hud should be opened when the right mouse button is clicked, or if the keyboard keys should be used instead (default: CTRL+DELETE).
Show waypoints
Choose which course waypoints should be displayed.
Warning lights
Choose if and when the beacon and hazard lights should be activated.
Waiting time
By default, drivers stop and wait at waiting points (except for field work and fertilizing/seeding modes), until the driver is told explicitly to continue (waiting time = 0 sec). When a waiting time has been set (above 0 sec), the driver waits at the waiting point until that set time has passed and then continues automatically. This can be useful for, e.g., a weight station at a BGA.
Default change
5 sec
CTRL change
10 sec
Map icons: display text
Only available if map icons are activated
This options activates / deactivates the text shown on the ingame map under the CP vehicles icons.
Debug channels
Should there be any problems with Courseplay, you can activate debug channels that provide prints in the game's log. This is important information for the developers, so they can find and fix errors.
Don't use this unless the developers ask you to!
HUD: Drive and work settings
Lane offset
Only available in "fertilizing/seeding" and "field work" modes
When you have multiple tools driving the same field course, use this option to set their effective lanes.
See the FAQ for further information (“How to use the offset? — a.k.a. how do I let multiple vehicles drive a fieldwork course?”)
Default change
0.1 m
CTRL change
0.5 m
Symmetric lane change
Only available in "fertilizing/seeding" and "field work" modes, and only if the lane offset is not zero
This options determines the type of lane change for a vehicle driving with lane offset.
Regular lane change: the vehicle always drives left/right of its lane.
Symmetric lane change: The tool switches from left to right / right to left each lane, thus creating a symmetric pattern.
See the FAQ for further information (“How to use the offset? — a.k.a. how do I let multiple vehicles drive a fieldwork course?”)
Tool offset horizontal
Only available in "overloader", "fertilizing/seeding" and "field work", "combine self-unloading" and "Fieldsupply" modes
For some tools it might be important not to drive the course exactly in the center line, but slightly to the right or to the left (e.g. bale collectors). This option lets you set this offset. It can also be used for filling / overloading points, to accommodate different vehicle sizes on the same course.
Default change
0.5 m
CTRL change
1 m
Tool offset vertical
Only available in "overloader", "fertilizing/seeding", "field work", "combine self-unloading" and "Fieldsupply" modes
Identical to the horizontal offset, only that the driver drives further ahead/behind the actual course.
Default change
0.5 m
CTRL change
1 m
Always use 4WD
Only available if the DriveControl mod is installed
Courseplay automatically activates and deactivates 4WD depending on the situation and the course. This option forces 4WD to always be on.
Copy course
Lets you copy the exact course and waypoints from another vehicle. Also works with combined, generated or unsaved courses.
First choose the vehicle whose course you want to copy, then press the button. The current course and waypoints will be overwritten completely.
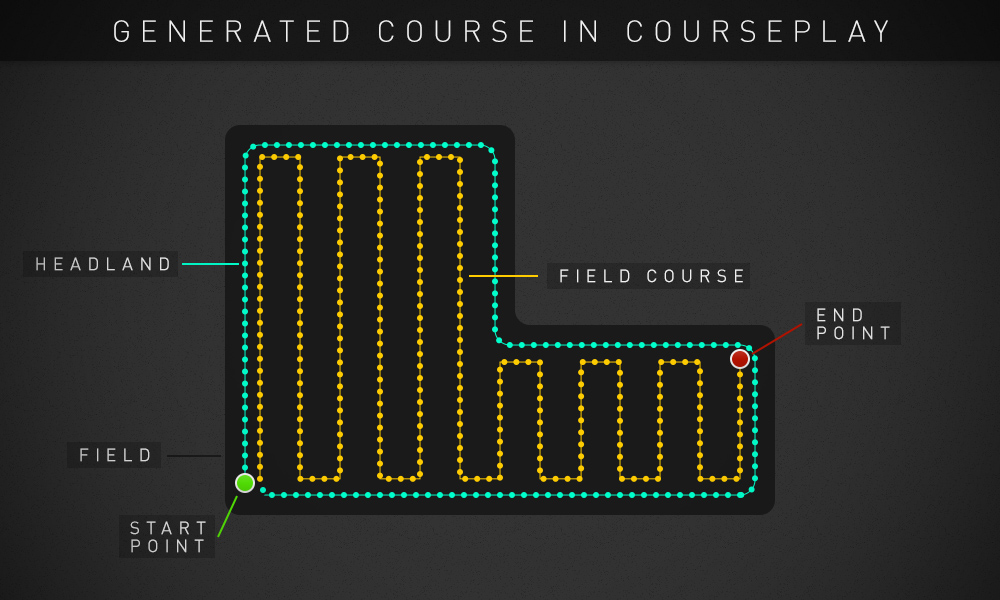
HUD: Course generation
This page is only displayed in the "Fertilizer and seeding" and "Field work" modes.
Only available if fields have been scanned or custom scanned fields exist
This setting contains a list of all the scanned fields (both automatic and custom). Choose the field for which you want to generate a course. If no field edge path has been selected, the currently loaded course will be used instead as a fictive field border path.
When a field edge path has been selected, you can view its borders with the visibility button.
In addition, the Seed Usage Calculator can display the amount of seeds needed for the selected field, for every fruit available in the game.
Work width
The tool's work width can be set here, from which the course's lane width is calculated. While changing the width, red lines representing the work width are displayed at the vehicle/tool.
Default change
0.1 m (above 10 m: 0.5 m)
CTRL change
0.5 m (above 10 m: 2 m)
The work width can also be calculated automatically for the current vehicle/tool constellation by clicking the (calculator) button.
This setting is required in order to be able to generate a course.
Starting corner
Choose the field corner from where the course will begin.
This setting is required in order to be able to generate a course.
Starting direction
Choose the direction that the first lane will go from the starting corner. Available choices depend on the starting corner.
This setting is required in order to be able to generate a course.
Return to first point
Choose whether the driver should drive back to the first (start) point when the tool is full (field work mode) / empty (fertilizer/seeding mode).
Headland
Set whether the course should include headland ("turn row") ( Wikipedia), whether it should be clockwise () or counter-clockwise () and whether it should be before () (e.g. with a combine) or after () (e.g. with a seeder).
Generate course
When all required options have been set, the "generate course" button () becomes available. Clicking it, it generates the course with the above settings. Again, the minimum requirements are:
Either a field edge path or a course with at least 5 waypoints must be loaded (when headland is activated, the course has to have at least 20 waypoints)
the loaded course has not been generated
the loaded course has not been combined from multiple courses
Position the arm, shovel and grabber to your liking, then click the corresponding button.
Pro tip: We recommend that you not lift/lower/open etc. the shovel and grabber to their maximum rotations and translations — otherwise they might get stuck during the driving of the course.
These positions do not have to be set during recording. They also do not indicate when the shovel should have the set position. They can be overwritten at any given time. They will be saved in the vehicles.xml file.
Loading position
The position of the arm, shovel and grabber during loading.
Fig. 1: Shovel in loading position
Transport position
The position of the arm, shovel and grabber during transport.
Fig. 2: Shovel in transport position
Pre-unloading position
The position of the arm, shovel and grabber before unloading. This position is used so the shovel doesn't crash into a waiting trailer.
Fig. 3: Shovel in pre-loading position
Unloading position
The position of the arm, shovel and grabber during unloading.
Fig. 4: Shovel in unloading position
Stop + go loading
If activated, the driver will stop when the shovel is being filled. The driver will move forward when it's not filled anymore until it's filled again, repeating until it's full.
If not activated, the driver will drive through the silo, being filled while moving (default setting).
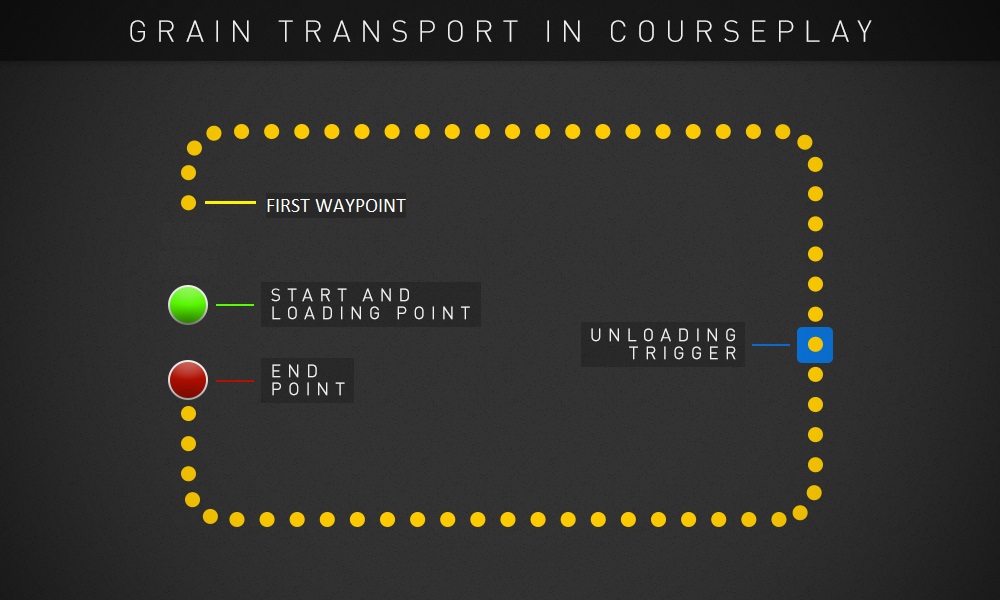
HUD: Bunkersilo befüllen und verdichten Einstellungen
The tractor waits at the first waypoint until his trailer has been filled. This can happen at a silo, at a field edge or anywhere else. As soon as the fill level reaches the set percentage (Drive on at %), the driver starts to drive the course. As soon as he reaches an unloading trigger, he unloads automatically. Afterwards he continues the course to return to the first waypoint.
The last waypoint should be 5 to 10 m ahead of the first, and have somewhat the same direction as the first.
Start point, waypoints, unloading trigger and end points in the grain transport mode
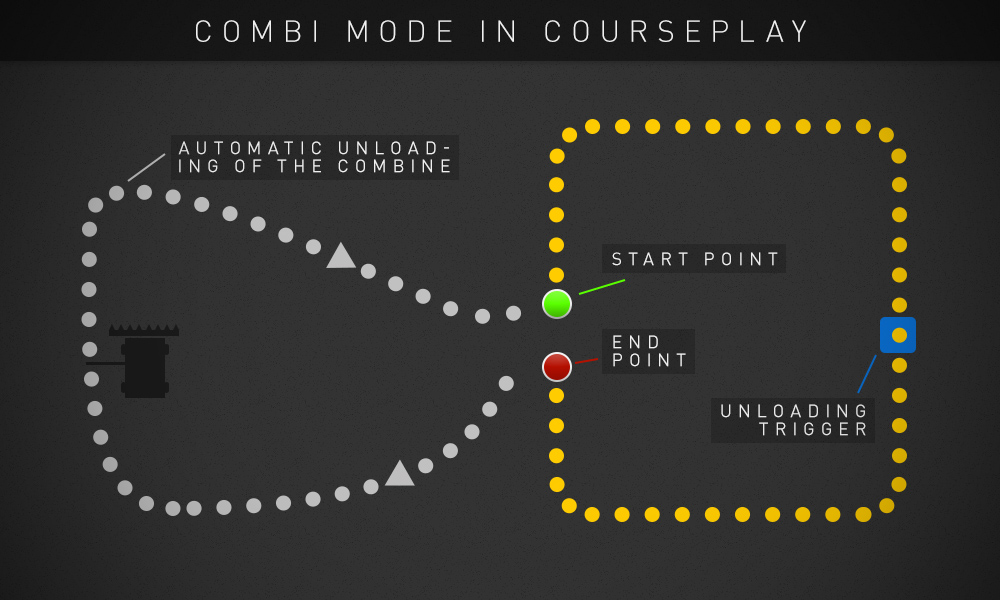
Combi
The combi mode is very similar to the Grain transport mode, in that the tractor drives a course and unloads at a trigger. But, in addition, the driver unloads a working combine or chopper on the field.
The tractor waits at the last waypoint until it has a combine, chopper or harvester in reach, and said combine's fill level is above the percentage (Start at %) set for the tractor. Then, the driver drives to the combine, comes from behind, and drives underneath the pipe, where the combine starts to unload into the tractor's trailer. If the trailer isn't full yet (Drive on at %), the tractor turns around and waits in the field for his next unloading operation. As soon as the trailer's fill level is above the Drive on at % percentage, the driver will drive to the course's second waypoint, and from there continue the course, unloading the trailer and returning to the field.
Combine, start point, waypoints, unloading trigger and end points in the combi mode
The tractor has two possibilities to have a combine in reach:
The course's last waypoint is on the field where the combine is working. Mostly, the driver identifies the combine automatically (if the field isn't too big or too hilly). The driver also identifies multiple combines and assigns himself to the combine that fits best for him (based on distance and the combine's fill level).
The tractor is assigned to one distinct combine (see HUD: manage combines). Only the selected combine will be unloaded, none else. In this mode, it doesn't matter if the tractor and the combine are on the same field. The tractor can wait outside of the field and still drive to/from the combine.
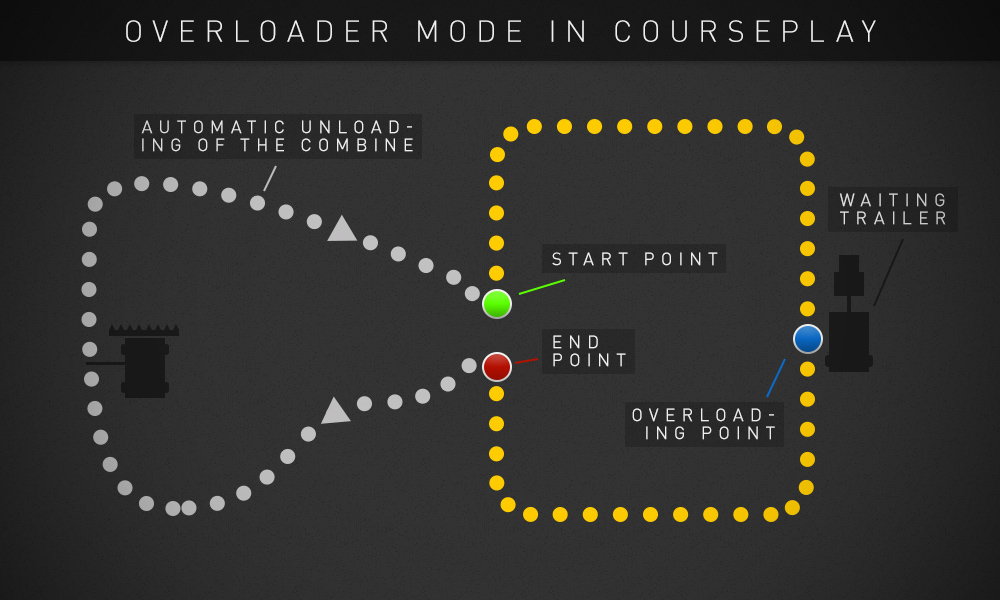
Overloader
The overloader mode is somewhat similar to the combi mode, in that the driver unloads a combine. But instead of the driving a course to an unloading trigger, the driver overloads into a waiting trailer. As with the combi mode, a combine can be found automatically or set manually.
The course's start point should be in proximity to a waiting trailer (e.g. another tractor in "driver helper" mode). From there, the course must lead to the trailer. When the overloader's pipe is above the waiting trailer (so when it's able to overload), a waiting point needs to be set. Later, while driving the course, this waiting point tells the overloader to stop, extend the pipe, and start overloading. During, an info message XYZ has reached overload point. will be displayed. When the overloader is empty, the driver will continue the course and wait at the last waypoint for his next unloading operation.
After the waiting point, the course needs to extend a little further (away from the trailer), ideally back to the start point.
Start point, waypoints, waiting/overloading point and stop point in the overloader mode
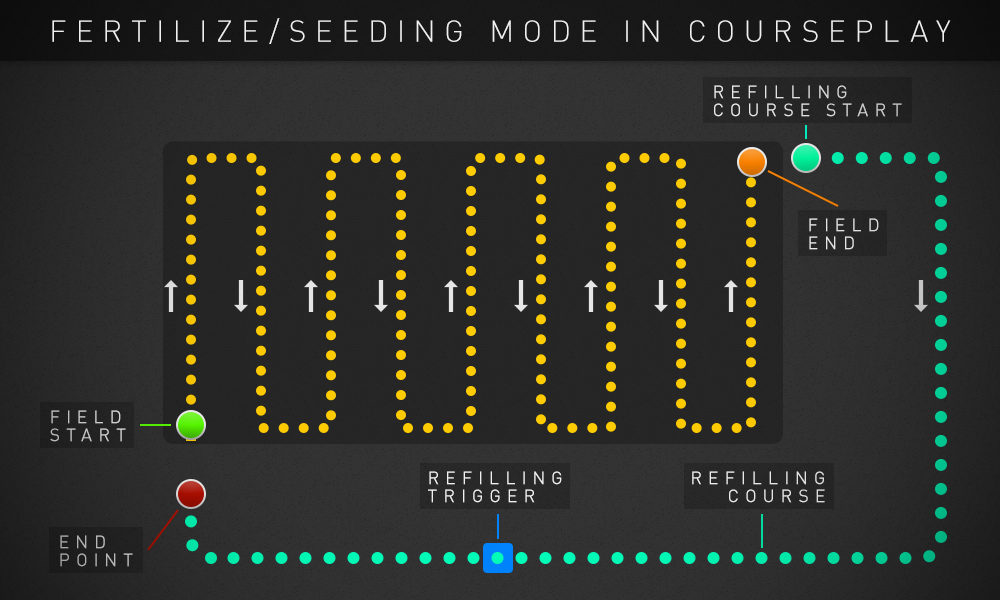
Fertilize and seeding
When fertilizing or seeding, there are two sections: one, the actual work part on the field, and two, the course from the field to the refilling trigger and back to the field.
The field work course can be created in two different ways:
You record the course yourself. It is important that there need to be two waiting points. The first one at the position where the work on the field should start, and the second at the position where the work on the field should end. This work area is absolutely necessary for the correct functioning of this mode.
The course can be generated automatically. For further information, see the Generate course section. The waiting points will be set automatically.
The second part, the automatic refilling, is a regular "A to B" course. It should start at the second waiting point (so, the end of the field work course), then go through the fertilizer/liquid manure/seeding trigger, and back to the field, ending just before the first waiting point of the field work course. As soon as a refilling trigger is recognized, the driver stops and refills automatically. If a tool isn't fillable via a trigger, but rather manually (e.g. a solid manure spreader or via a liquid manure transfer trailer), an additional waiting point has to be set and the point where the tool should be filled.
When driving through a trigger or waiting at the refill waiting point, the driver will wait until the tool is filled with the percentage set in the Refill until percentage option (default: 100%, available on the Combi mode settings page) and then continue his course.
Start point, waypoints, stop point and refill course and trigger in the fertilizer/seeding mode
As soon as the tool is empty, it goes into transportation mode and the driver follows the refilling course. Back at the field, the driver drives to the point on the field where it last stopped work, sets the tool into work mode, and continues working.
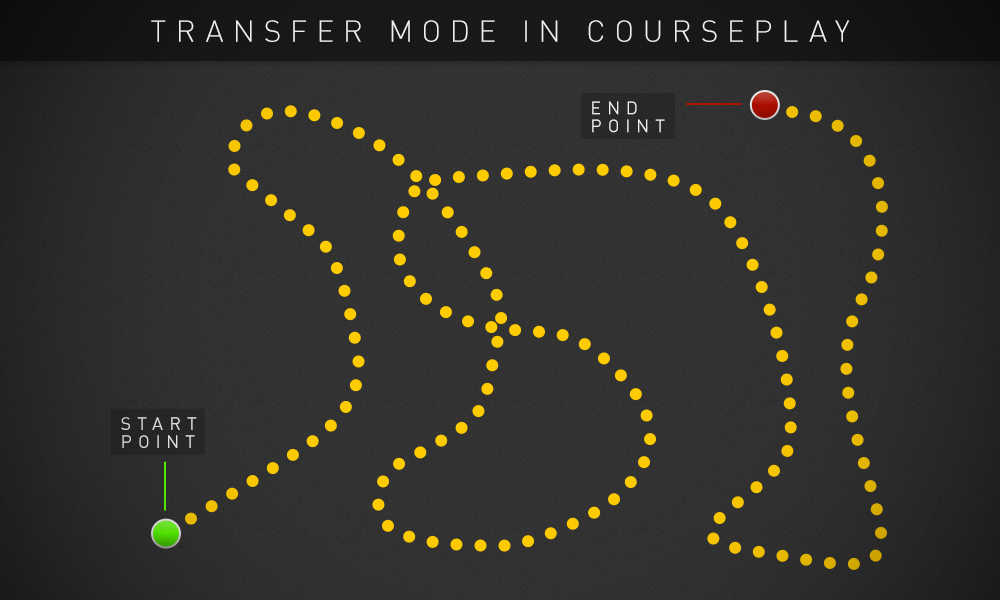
Transfer
The transfer mode is the most simple form to get from A to B. It uses a completely regular course with a start and an end point. The driver blindly follows that course, without unloading or other fancy stuff. Reaching the end, the driver returns to the start point and repeats the course. If you want to prevent that, you need to activate the Stop at last point or at next trigger option.
Start point, waypoints and end point in the transfer mode
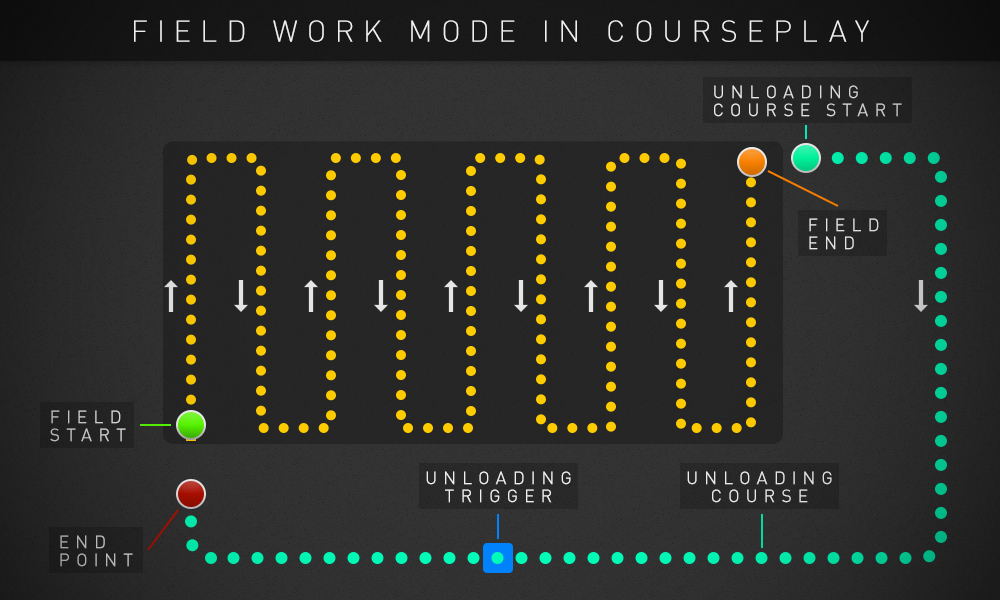
Field work
The field work mode is the work horse of all the different modes: it can be used for pressing and collecting bales, windrowing, teddering, cultivating, collecting grass or straw, and much more.
Basically, it works much the same as the fertilizing/seeding mode, only that the tool needs to be emptied/unloaded instead of being refilled. Also, the work area must be defined between two waiting points; the unloading course needs to go through a corresponding trigger.
As in the fertilizing/seeding mode, the field work course can be generated in two ways:
You record the course yourself. It is important that there need to be two waiting points. The first one at the position where the work on the field should start, and the second at the position where the work on the field should end. This work area is absolutely necessary for the correct functioning of this mode.
The course can be generated automatically. For further information, see the Generate course section. The waiting points will be set automatically.
Start point, waypoints, stop point and unloading course and trigger in the field work mode
Tools will be (un)folded and (de)activated automatically. Drivers with balers as tools will stop and unload the bales automatically.
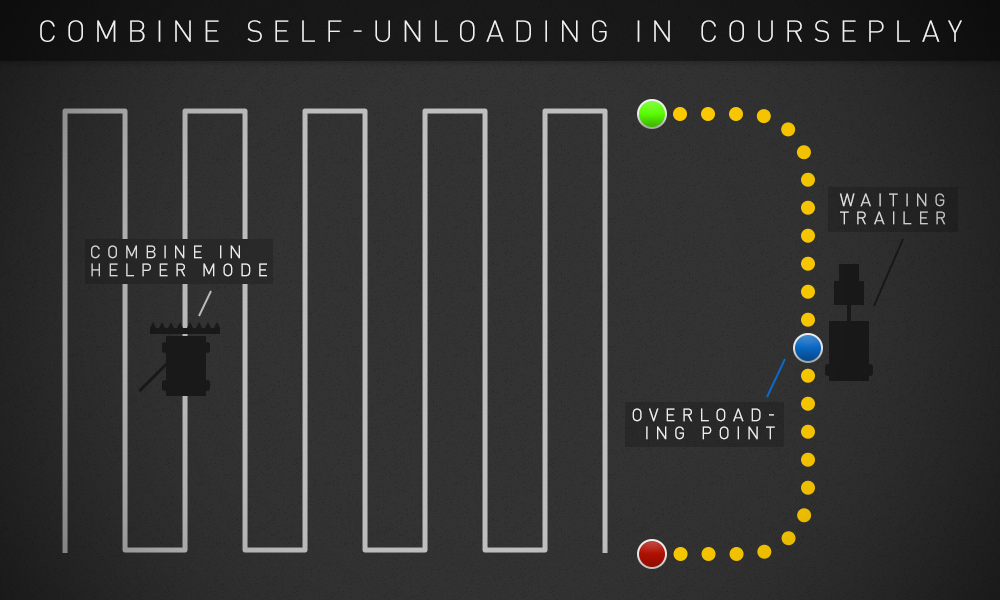
Combine self unloading
This mode works similarly to the overloading mode. The course must have a waiting point at the overloading position, where the combine will stop, extend the pipe, and unload.
Helper route, start point, waypoints, overloading point and stop point in the combine self unloading mode
The combine needs to be hired as a regular helper (or with AutoCombine), and only then Courseplay may be activated. The combine will work as a helper until its fill level reaches the percentage set at Start at %. Then it drives to the course's start point, follows the course until the waiting point, where it will unload into a waiting trailer. After, it will follow the course until the end point, from where it will drive to the last position where it worked as a helper. Now, it will activate its cutter and continue threshing.
At the moment, only helper courses in the four standard directions (north, east, south, west) - or the usage of AutoCombine in up/down mode - are supported.
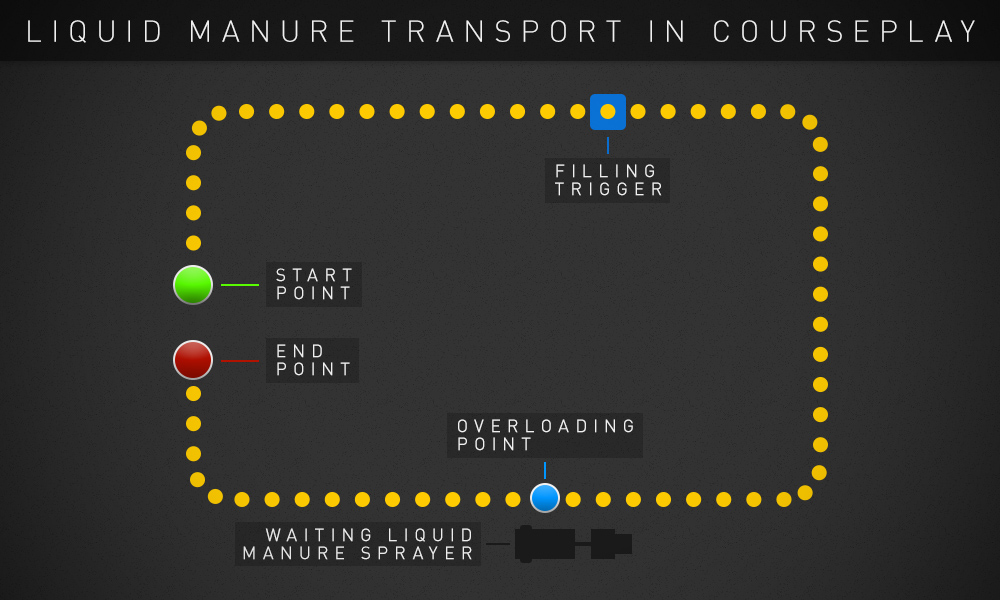
Liquid manure transporter
The liquid manure transporting mode is for transporter barrels and similar tools that have an integrated liquid manure filling trigger. The tool is refilled at a liquid manure silo and then driven to a field's edge, where a working liquid manure barrel can refill automatically.
It basically doesn't matter where the course begins or ends, only make sure of two things:
The course must lead through a liquid manure trigger (e.g. liquid manure silo) so it can be refilled there automatically.
At the position where the liquid manure barrel should refill (hence the transporter should stop), there needs to be a waiting point.
Start point, waypoints, filling trigger, overloading point and stop point in the liquid manure transport mode
The driver will continue from the waiting/overloading point as soon as the tool is empty.
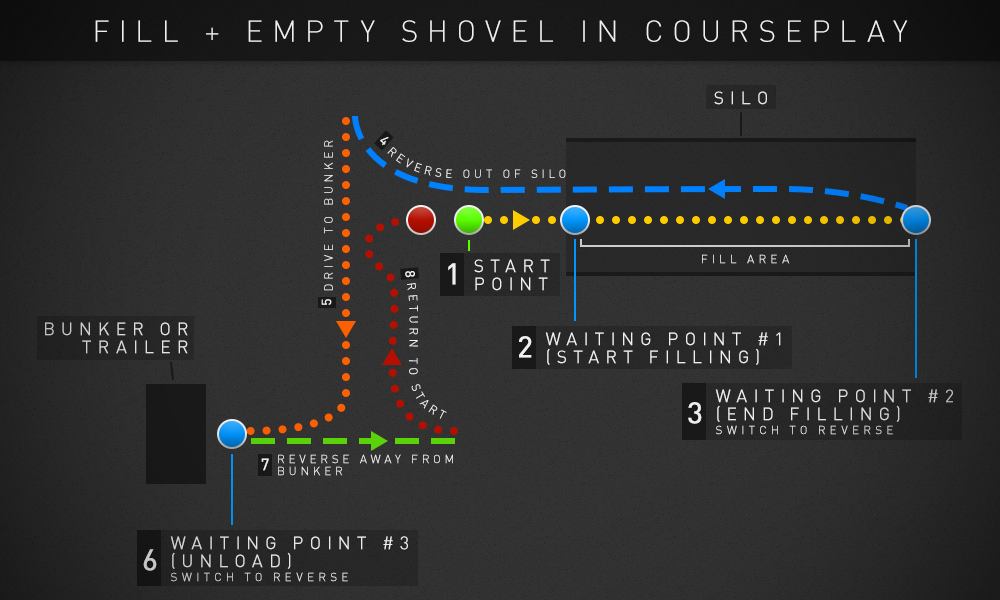
Fill and empty shovel
This mode lets you fill a shovel in a designated area (e.g. a BGA silo or manure heap) and unload it into a bunker or trailer.
The course setup has to be as follows:
All points and directions in the fill and empty shovel mode
Start in front of the silo, and drive forwards.
At the point where the shovel should start loading, set waiting point #1. This point indicates the start of the filling area. During the driving of the course, the shovel will be set to the
At the end of the silo, set another waiting point (#2). This point indicates the end of the filling area.
Set the direction to reverse, and reverse back out of the silo (and a bit further). Try to drive as straight as possible.
Set the direction to forwards, and drive to the bunker/trailer that you want to fill. The last 3 or 4 waypoints of that section should be as straight as possible.
At the point where the shovel should unload, set waiting point #3.
Set the direction to reverse, and reverse back as straight as possible.
Set the direction to forwards and drive back to right before the starting point.
Before starting the driver, make sure you've set the necessary shovel positions.
When starting the driver, he will drive to waiting point #1 and set the shovel to the loading position (). He will continue until the shovel is full, then stop and set the shovel to the transport position (). He will then switch to the "reverse out of the silo" part of your recording, and continue to drive the recorded course.
Four waypoints before waiting point #3 the driver will set the shovel to the pre-unloading position () and start looking for a bunker or a trailer to unload to. If nothing has been found, the driver will stop. If something has been found, the driver continues until the shovel is ready to unload into the bunker/trailer. The shovel will then be set to the unloading position () and unload.
If filling into a trailer, the trailer does not have to be exactly at/behind waiting point #3, it can in fact be situated slightly in front of it. But, to ensure a perfect procedure, the trailer should be right at your waiting point #3. After unloading, the shovel is set back to the pre-unloading position (); the driver will use the "reverse from bunker/trailer" part of your recording and continue the course from the until it reaches the end point.
In order to generate a field course (for the field work and fertilizing/seeding modes) automatically, the following steps need to be done.
If the field scanner is activated, choose a field edge path from the list. If no field is selected, the currently loaded course (if present) is used as a field edge path.
Set the work width. The work width is needed to calculated the distance between the course's lanes.
Set the starting corner. Depending on the size and form of the field and the chosen starting direction, the starting point's position can be in different places:
Two possible starting positions with a "north east" starting corner
Selecting Vehicle position or Last used position instead of a corner starts a different course generation algorithm.
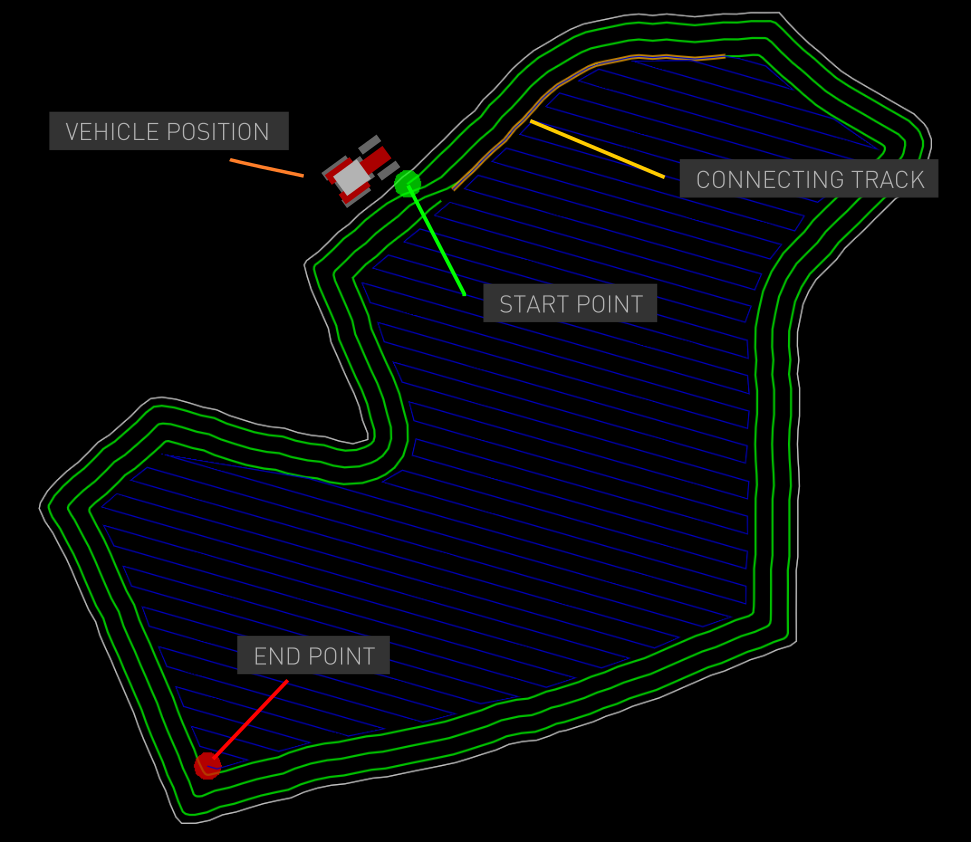
In this mode, the vehicle's position determines the start or end of the headland tracks. If you work the headlands
first ()) the course will start at the field boundary nearest to the vehicle.
If you work the headland last (), this is where the course will end.
Start of course is based on vehicle position
The algorithm calculates the direction of the up/down tracks in the middle automatically. It finds the direction where
the number of the generated tracks is the minimum while the field can be covered in a single pass.
Due to the nature of this automatic alignment, the up/down tracks won't necessarily start where the headland ends,
so often, there's a connecting track is needed between the two (see the above picture). The vehicle will raise and
turn off implements while traveling on that connecting track.
Set the starting direction. That's the direction that the first lane will have.
(optional)
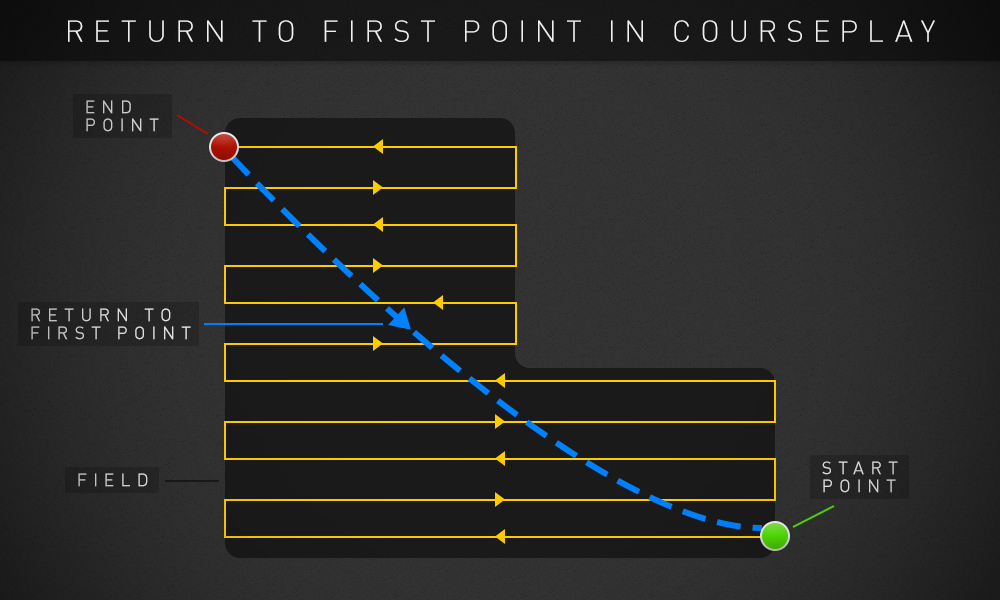
Activate/deactivate Return to first point. If activated, the driver will drive to the starting point (instead of the end point) when the used tool is full (field work mode)/empty (fertilizer and seeding mode). This can be useful if the unloading/refilling course begins at the starting point.
The driver returns to the starting instead of the stopping at the end point
This settings will be hard coded into the course, meaning it can not be changed dynamically while the course is being driven.
(optional)
Set your headland options. Courseplay currently supports a maximum of six lanes, which can be either before (e.g. with a combine) or after (e.g. with a cultivator) the field course. If the headland is set to "before", it will start approximately at the set starting corner. If it's set to "after", the field course will continue directly into the headland lane.
Also choose the direction of the headland: clockwise or counter-clockwise
Depending on the size and form of the field, the set starting corner and start direction, it can happen that the headland begins at a point where there are multiple waypoints close by (e.g. the field course's points). This can lead to the driver not always finding waypoint #1. Should this happen, you can set Start course at first point on the Driver controls page.
Click the generate course button.
A generated course with one lane of headland
If the generate course button is disabled, you should check if all requirements are met:
A valid field edge path / a course with at least 5 waypoints must be loaded (when headland is activated, the course has to have at least 20 waypoints)
The loaded course has not been generated
The loaded course has not been combined from multiple courses
A starting corner has been set
A starting direction has been set
The waiting points at the start and the end will be set automatically. If you want to add an unloading/refilling course, the field course must be generated first. Afterwards, add the unloading/refilling course.
Field scanner
The Courseplay field scanner scans the map's fields and generates a field edge (field border) path. These edge paths can be used as the basis for a course generation. There's no need to drive around the field manually anymore. The automatic scanner runs on every savegame load and does not save or load the paths. The progress of the scan is displayed.
When you start a new savegame, there will be a dialog where you can activate/deactivate the automatic scan.
The scanner also features a manual scan setting: drive onto the field, and use the corresponding buttons and orders to create and save your custom field edge path. These custom field scans are saved into and loaded from the courseplayFields.xml file. Please see HUD: Drive controls for detailed information.
The field scanner can only scan fields that have a field (cultivated, plowed, seeded) terrain. Meaning: if you've sown grass on a field, it doesn't count as a regular field anymore and the edge points can not be scanned. So if you plan to convert a field to a grass area, make sure to manually scan it first and save the path so you can use it later for generating courses.
There are multiple scanner settings that can be set in the courseplay.xml file (courseplayFields tag).
automaticScan: activate ("true") or deactivate ("false") the automatic scan
onlyScanOwnedFields: if activated ("true"), only the fields that you own are scanned. Also when you buy a new field, it will be scanned immediately. If deactivated ("false"), all fields are scanned.
debugScannedFields: if activated ("true"), debug information concerning the automatic scan will be printed in the log.
debugCustomLoadedFields: if activated ("true"), debug information concerning the manual scan will be printed in the log.
scanStep: determines how detailed the path is going to be. Only change if the developer asks you to.
On some maps, fields are too close together to be scanned correctly. The automatic scanner will most likely stop and/or crash. At the moment there is no viable solution for that problem.
Reverse driving
Courseplay can handle reversing with a trailer attached. Both tandem and pivot trailers are supported. Reversing works both with straight and curved routes. This can be especially useful if a tip trigger or unloading point can't be really reached from the front or the sides. Only one trailer is supported, not multiple simultaneously.
Be aware of a couple of regulations when reversing with a trailer:
The tractor will align the trailer according to the next waypoint, so there should be enough lateral space.
The course should be recorded without a trailer attached, so the real intended course is recorded instead of the tractor's steering.
Be aware of the trailer's length; the radius around curves shouldn't be too narrow.
When driving backwards, the tip trigger will be found behind the trailer.
Unloading in silage silos can also be done in reverse. When recording the route, reverse to the backend of the silage bin and change to forward again and continue the route. Unloading will be done from the rear end of the silage silo. For better handling, unloading will start a couple of silo sections before to build up and ramp