This manual aims to describe the Courseplay hud, the changeable settings, and the different drive modes. Most likely, there will be one or the other thing missing.
If you find a topic not dealt with in this manual, please let us know.
This manual aims to describe the Courseplay hud, the changeable settings, and the different drive modes. Most likely, there will be one or the other thing missing.
If you find a topic not dealt with in this manual, please let us know.
In general, controlling Courseplay works with the mouse, due to free keys in Farming Simulator being rather rare. By using the DELETE the Courseplay hud, where you can configure and control the drivers, is activated. Normally, the hud will be opened with the right mouse button. Due to some controls like wheel loader, this will collide with opening the hud. In this case, you can go into our advanced Settings Page and deactivate it either for your current vehicle (first page) or global (second page) if you don't like to use right mouse button at all.
More functions can be assigned to any key or the mouse buttons in the game's options menu.
When opening the hud, the mouse controls are activated automatically. Meaning, you can not use the mouse to look around anymore. In order to deactivate the mouse controls, you need to click the right mouse button again. Alternatively you can click on the in the upper right corner of the hud. Doing so closes the hud and deactivates the mouse controls.
The hud is divided into multiple pages. You can navigate through those by clicking on the respective page icon at the very top. The pages' titles are displayed as a tooltip. Keep in mind the certain pages are deactivated while you're in a certain mode or vehicle.
In the center section on each page, a multitude of settings and options can be set and commands be given, simply by clicking on the chosen action or its corresponding buttons ///// with the left mouse button. Certain values and settings like scrolling through the course list, the settings of widths, speeds oder percentages etc. can be altered in bigger steps by pressing the CTRL key while clicking on the buttons. Some values and areas (like the course list) also accept the mouse wheel. This is indicated by a mouse wheel icon appearing next to the mouse cursor.
In the bottom part of the hud you'll find information about the driver, the loaded course and the current status.
This page is only accessible from combines, choppers, harvesters and tractors with attached combines or choppers. Note that unloading a human player driven combine by a Courseplay unloader is not supported for now.
Call a driver manually. If a driver has found the combine and is on his way, the name will be displayed.
Manually start or stop the current driver. If stopped, the driver will wait until being called to start again.
Manually send the current driver to follow his course. He will drive the course, unload/overload, and drive on to his first waypoint.
Only displayed for combines and harvesters (not choppers)
When multiple drivers should unload a combine or harvester, this option defines with which priority the drivers are called.
Only displayed for combines and harvesters (not choppers) in "field work" mode
When activated, the combine will stop during the unloading process until it's empty.
With this option, Courseplay's recording mode is activated. You can drive and record the course that the driver should use later. When recording is active, you can deactivate mouse controls by clicking the right mouse button, so you can look around while driving and recording.
See: "Recording mode"
Lets you copy the exact course and waypoints from another vehicle. Also works with combined, generated or unsaved courses.
First choose the vehicle whose course you want to copy, then press the button. The current course and waypoints will be overwritten completely.
See also: field scanner
While standing on a field, the field's edge/border path can be scanned. It is then displayed as blue lines and yellow dots (can be toggled with ).
If you want to save the edge path, choose a new field number for it with /. If a field edge path with that number already exists, you can overwrite it, otherwise your can add the path to the list.
Each manually scanned field is saved in the courseplayFields.xml file and loaded with the savegame.
Opens the advanced course generator
During the recording of a course, each newly recorded waypoint will be displayed with an orange pyramid dummy. Multiple buttons are displayed that let you influence the waypoints' settings. The buttons' functions are displayed as a tooltip when hovering over them.
You should make sure to go more or less straight until reaching the third waypoint.
The recorded course is only temporary: the next time you start the savegame, it will be gone, unless you save it first. (See: Manage courses)
When reaching the end point of your route, use "stop recording". It is advised to have the end point ca. 5 to 10 m before the start point, and for it to have about the same direction as the start point. Meaning: don't stop at a south direction while the course's start direction is north.
Pause the current recording. This option is only available after the third waypoint. A yellow arrow will be displayed, showing the direction to the last waypoint. Click the pause button again to continue. In addition, while paused you can delete the last waypoint (see "delete last waypoint").
This option is only available when the recording is paused. The current last waypoint is deleted. You can repeat this until only three waypoints are left.
While recording, you have the possibility to set waiting points on the course. At those points, the driver, while driving the course, will stop and wait until either you tell him to continue, or the configured waiting time has passed. When a driver reaches a waiting point, a message will be displayed (XYZ has reached waiting point.).
In certain modes, waiting points have special meanings, other than waiting: in the fertilizer/seeding mode, the wait point defines a position where the worker stops and wait until he got his set min% value reached, this can be done by a player or by a courseplay driver. They also indicate the start and end of the work area, as well as the area where to check for an unload point for shovel filling and unloading mode and for overloader mode, to set the overloading position.
Crossing points are "signal" or "combination points" where two separate courses can be combined (see Manage courses). In both courses, two crossing points (one in each course) that are closer to each other than 50 metres are determined. The combined course will lead up until the first course's crossing point, and from there go the second course from its respective crossing point.
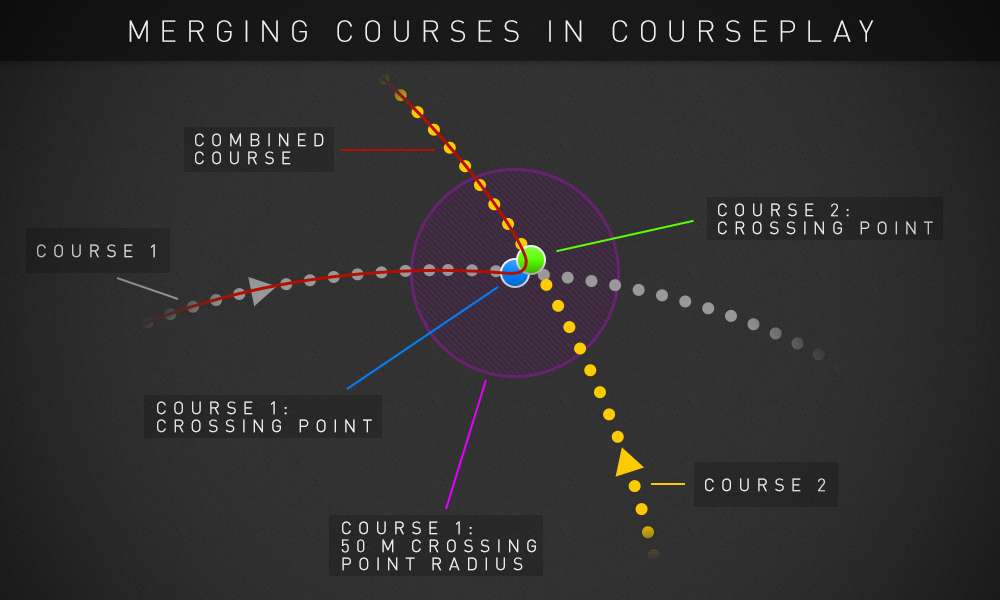
Note: A course's start and stop points are automatically set as crossing points. Hence, they don't have to be manually declared as those when recording.
While it is generally advised to have field courses generated, they can also be recorded manually. Setting the turn maneuver later tells the driver to do a turn maneuver on his own at this point - meaning lifting and/or turning off the tool. Clicking once activates the turn maneuver (the button turns green), clicking it again ends it.
Courseplay supports reverse driving with trailers in many modes. Activating this option later tells the driver to drive this portion of the course in reverse. You should only activate and deactivate it once you're at a complete stop and not rolling anymore. When active during the recording, you must drive in reverse, otherwise there will be severe driving errors later. Clicking once activates the reverse mode (the button turns green), clicking it again ends it.
See also: Reverse driving
Unload here points are used to tell the driver to create a heap, like a beet rental. They are also used in unloading chaff into a bunker when fill them up in reverse, as well as unloading bales.
When you have recorded or loaded a course, you can "hire" a driver to have him drive the course. From this moment on, you won't have any manual control over the tractor until you stop the driver.
Some courses have relatively many waypoints in a small area, especially at the starting point (e.g. generated courses with headland). Here you can choose if the driver starts the course at the nearest waypoint (default setting), the next closest (it takes the current vehicle direction into account), the current waypoint or directly at the first waypoint.
If you want to use AutoDrive to refill/unload/parking, the option will be here.
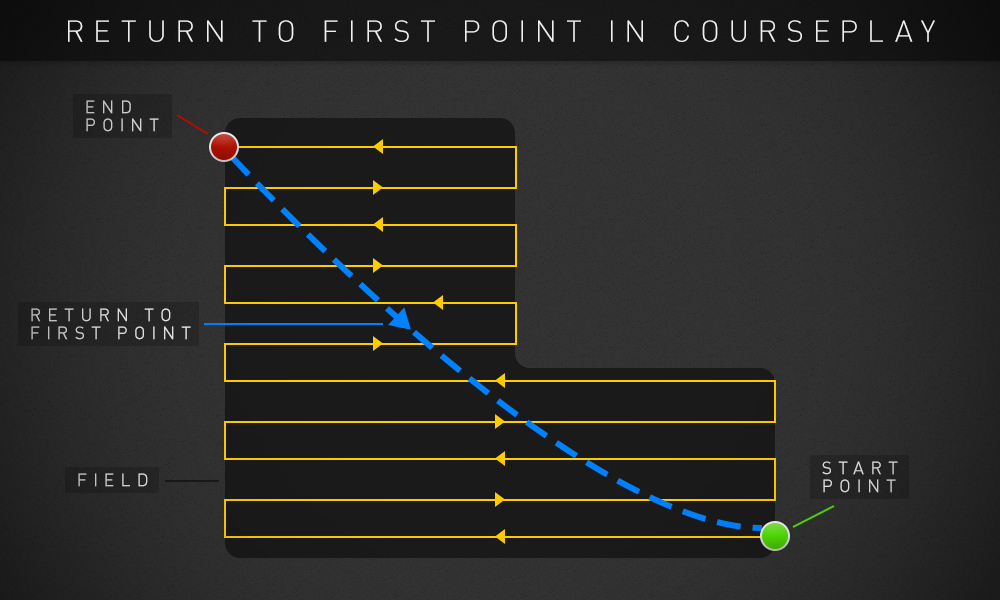
This option is used to define if the driver stays at the last waypoint of the fieldwork course, or drives back to the start.
In addition, you can also dismiss the driver automatically, as soon as you enter the driver, for quick start driving without dismiss the driver in the HUD.
In order to being able to do many different work types, there are different driving modes. Certain modes are only available for certain types of vehicles. For example, a tractor won't be allowed to drive in the shovel filling and emptying mode. The current mode will be highlighted in green. The mode names are display as a tooltip when hovering over the buttons.
The different modes are described in detail in the Driving modes section.
When a course has been recorded or loaded, you can delete the current course selection. The saved course will not be deleted from the save game, only the driver will clear his current course.
Of course you can always stop the activated driver. Later, when reactivating the driver, it will continue from the next valid waypoint.
When you're driving a "filling" course, for example unloading a combine in combi mode, or collecting grass in field work mode, you can force the driver to drive the unloading portion of the route immediately.
On this page you'll find an overview containing your saved courses and folders. The list can be scrolled through by using the up/down arrows / near the hud's right edge, or by using the mouse wheel.
The course management system basically works like a regular file system. You can create folders, move courses or other folders to it, and load and delete them. The courses and folders are saved in the courseplay.xml file.
With this option activated, the direction and distance to the course's first waypoint (in relation to the tractor) are displayed. This can be useful if you don't remember where the course's start is.
In order to record or load a completely new course, the current course must be cleared with this option. The course will not be deleted from the save game, only the driver will clear his current course.
This option lets you filter your course and folder list. A GUI will open where you can enter the name. When the filter is active, you can deactivate it by clicking .
Creates a new folder on the base level. A GUI will open where you can enter the name.
Saves the currently active course as a new course in the file system. A GUI will open where you can enter the name.
Loading the course. If there already is a course loaded, the clicked course will be merged into the already loaded one at the first common crossing point. In both courses, two crossing points (one in each course) that are closer to each other than 50 metres are determined. The combined course will lead up until the first course's crossing point, and from there go the second course from its respective crossing point.
If there already is a course loaded, the clicked course will be added at the end of the already loaded course. Otherwise it will be loaded as usual.
The course will be deleted completely from Courseplay and the save game. It will not be available anymore, not even when loading the game again. A folder can only be deleted if it doesn't contain any more courses and/or folders.
The course (or folder) will be moved to the then selected folder.
Depending on the Mode you selected, you have a few different options.
The values can be changed with the mouse wheel.
This value defines the driving tractor's turning circle, it defines the minimum turning circle for the Pathfinder. The value, like the side offset, is calculated automatically (based on wheel angle, wheel base, track width, number of trailers), as soon as a driver is hired. You can reset it to "automatic" by setting it to 0 (zero).
This value defines the combine's fill level percentage that tells the driver to drive to and unload it. When unloading choppers, this value defines when the second unloading driver should join the unloading chain.
For normal combines, the unloader will only start if the pipe won't be in the fruit and the option unload on first headland is activated.
Note: if fruit avoidance is activated, the driver will always drive to the combine at the set %, even when the pipe is in the fruit.
This value defines at which trailer fill level percentage the driver should start to drive the course to the unload point. This can be useful if, e.g., the trailer is 97% full and the driver shouldn't wait 5 more minutes for the next unloading, only to get a measly 3%.
This value defines at which trailer fill level percentage the driver should start to drive the course to the unload point. This can be useful if, e.g., the trailer is 97% full and the driver shouldn't wait 5 more minutes for the next unloading, only to get a measly 3%.
As soon as you added a fill type to load or reload, the fill type will be displayed with a few values:
Count (only for Grain Transport): How many times will the Driver load that fill type from a silo.
Max: The maximum value it should try to load (less is accepted too).
Min: How much should the driver minimal load, if he can't, he will wait for more to come until he can load the min value.
This page is displayed only in the "combi" and "overloader" modes.
Here you can choose which Combine(s) you want to unload by clicking the [ ] and mark the Combine(s) with an X -> [X]
In case you can't find your Combien on the right field, you can filter the list by choosing a field and only the combines on that field will be shown in the list.
Here you can set how fast your driver should drive. Also, you can choose if a course should be driven with the speed used during the recording, or the maximum speed.
Switching Speed: from recording and Speed: maximum speed determines if the speed used during the recording or the set maximum speed should be used.
Note: the unloading speed is also used for reversing.
Opens up our advanced settings page.
Looks for an empty trailer that can load the harvested fill type and drive to it to unload.
This option will always unfold the pipe when the Combine or Harvester is full, so you won't have to drive near it to open it.
This option controls the Combine straw swath option (F1 Menu). You can deactivate it completely, activate it only for center part (on headland it will be off) or have it active as normal (default).
Allows the Combine to call an Unloader on the 1st Headland. If this option is off, Combine will only call for an Unlader when he created a pocket at 95% fillvolume.
Turns on/off the automatic use of Ridgemarkers.
With this option you can turn off the fertilize function of seeders, no fertilizer will be used.
Turn this option off if you don't want the worker to fold implements at his last waypoint of fieldwork course. This is useful for Combineheaders that got it own Headerwagon.
Choose which course waypoints should be displayed.
Should there be any problems with Courseplay, you can activate debug channels that provide prints in the game's log. This is important information for the developers, so they can find and fix errors.
Don't use this unless the developers ask you to!
This side is accessible from General Settings Page.
Let the AI driver perform the turns.
This does only work for 3-point attached tools and Combines.
Let the pathfinder generate the best way to the next row, this is useful when your next row is behind a corner or on the other side of the field or island.
Decide if the pathfinder is allowed to generate a reversing course.
Towed implements will never get a reversing course.
On/off the right mouse click to open the HUD, only for the current vehicle.
If this option is on, the Vehicle will show the waypoints generated by pathfinder or for turns.
At each end of a line, the implement will be raised, if the line is driven to long or not long enough (depending on the tool) change the value to early/late.
Basically the same as raise implement, but for the start of the next row.
Keeps the current steeringmode, that is set for the vehicle.
Will load all course at startup, which will lead into a longer load time of your savegame. You can turn this off to get quicker into your savegame, but when load a course from course Manager, it might take a while until the course is loaded, depending on the amount of waypoints.
Scan all fields at the start of your savegame.
If you want to give your courseplay drivers money, set this to your desired value (0% is off, 100% is normal GIANTS helper amount).
On/off the right mouse click to open the HUD, this option is for all vehicles.
If you have your mouse courser active, you can click with the left mouse button on a vehicle to switch into it.
Simply turns on/off the mini-HUD.
Turn on and off what you want to see on the Map.
This option will repair your vehicle according to the status of your Vehicle GUI. 100% is completely healthy.
The values got choosen according to this table: Damage-yield-table.
It will repair when under 70% health which is 30% damage and will start to gain less crop yield.
Repair under 25% health, will be 75% damage and is about 25% less crop yield.
Choose if and when the beacon and hazard lights should be activated.
When driver is standing still at a certain point for a while, it will turn off the engine to save fuel.
Whenever a driver passes by a gas station and refuel point, choose if always refuel or just when under 20%.
Automatic open/close covers on or off.
WIP
When active, the driver will align the work area before the start point.
On this page, you can set different kind of offsets, depending on your course and mode. - WIP
Only available in "fertilizing/seeding" and "field work" modes
When you have multiple tools driving the same field course, use this option to set their effective lanes.
See the FAQ for further information (“How to use the offset? — a.k.a. how do I let multiple vehicles drive a fieldwork course?”)
Only available in "fertilizing/seeding" and "field work" modes, and only if the lane offset is not zero
This options determines the type of lane change for a vehicle driving with lane offset.
See the FAQ for further information (“How to use the offset? — a.k.a. how do I let multiple vehicles drive a fieldwork course?”)
Only available in "overloader", "fertilizing/seeding" and "field work", "combine self-unloading" and "Field Supply" modes
For some tools it might be important not to drive the course exactly in the center line, but slightly to the right or to the left (e.g. bale collectors). This option lets you set this offset. It can also be used for filling / overloading points, to accommodate different vehicle sizes on the same course.
Only available in "overloader", "fertilizing/seeding", "field work", "combine self-unloading" and "Field Supply" modes
Identical to the horizontal offset, only that the driver drives further ahead/behind the actual course.
This page is only displayed in Fill and empty shovel mode.
Position the arm, shovel and grabber to your liking, then click the corresponding button.
Pro tip: We recommend that you not lift/lower/open etc. the shovel and grabber to their maximum rotations and translations — otherwise they might get stuck during the driving of the course.
These positions do not have to be set during recording. They also do not indicate when the shovel should have the set position. They can be overwritten at any given time. They will be saved in the vehicles.xml file.
The position of the arm, shovel and grabber during loading.

The position of the arm, shovel and grabber during transport.

The position of the arm, shovel and grabber before unloading. This position is used so the shovel doesn't crash into a waiting trailer.

The position of the arm, shovel and grabber during unloading.

This Mode got 3 different modes: filling up, leveling and compacting.
Drives to the wait point when a CP driver/AD driver or any vehicle with running engine is within the detection range.
Set the range of where to detect other vehicles, the detection is a circle, which center is the stop point of the Drivers course.
The range will be shown when you change the value.
General tool width, which will be used to calculate the lines where the driver is able to drive to not touch the walls.
Speed how fast we drive into the silo.
The automatic height will be measured at the start of the course and is slightly over the ground.
Increase this value to choose a leveling hight, or when the filling up mode keeps getting stuck at the ground.
There are nine different driving modes:
If you don't add any fill type in the HUD list, the tractor waits at the first waypoint (the middle of the trailer will be positioned on the first waypoint) until his trailer has been filled. As soon as the fill level reaches the set percentage (Drive on at %), the driver starts to drive the course. As soon as he reaches an unloading trigger, he unloads automatically. Afterwards he continues the course to return to the first waypoint.
The last waypoint should be 5 to 10 m ahead of the first, and have somewhat the same direction as the first.
For loading a fill type at a trigger (e.g. silo) you have to add up to 5 fill types in the HUD list, which will be loaded when:
In case one of those conditions can't be fulfilled, the next fill type will be loaded (if you got more then one).
In case your selected min value can't be reached, you will get noticed that there is not enough left in the silo.
If you have more then one trailer (or a multibin trailer) you can load up to 3 different fill types, by clicking at Separate Trailers.
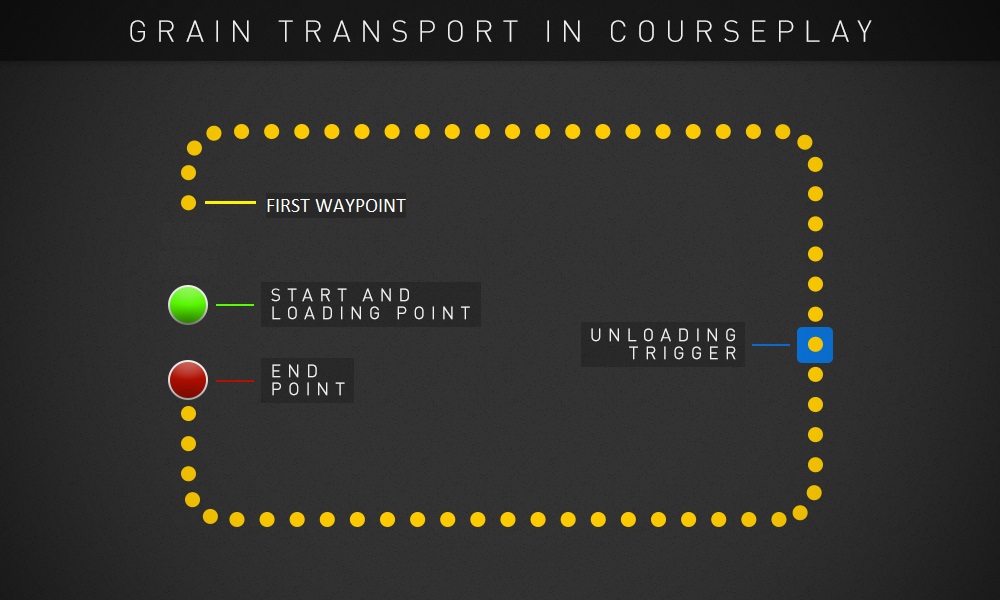
One important thing for a Grain Transport Course is, after you started recording, drive in a straight line, so your first waypoint is a few meters ahead of your start waypoint
The combi mode is very similar to the Grain transport mode, in that the tractor drives a course and unloads at a trigger. But, in addition, the driver unloads a working combine or chopper on the field.
The tractor waits at the last waypoint until a combine, chopper or harvester calls him. This will happen if:
Start at %) set for the tractorWe also have some conditions on when and where the unloader will go to the combine:
When the Unloader knows where to go, it will start to drive it's path to the Combine. When the driver is near, the combine will start to unfold the pipe, as soon as the pipe is fully unfolded, the driver will place the trailer under it with an automatic offset, which can be corrected in the offset menu
If the trailer isn't full yet (Drive on at %), the tractor stops or moves back a bit and waits in the field for his next unloading operation. As soon as the trailer's fill level is above the Drive on at % percentage, the driver will drive to the course's first waypoint, and from there continue the course, unloading the trailer and returning to the field.
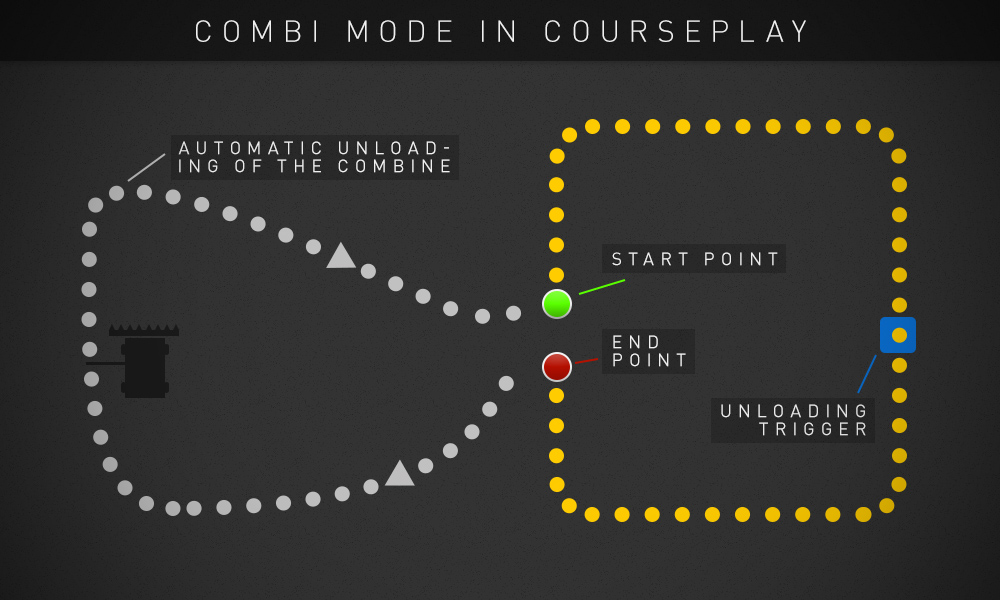
You should only use one trailer, as there are some reverse driving operations.
Manual driving the combine is not supported yet, as we have a communication between the combine and the unloader.
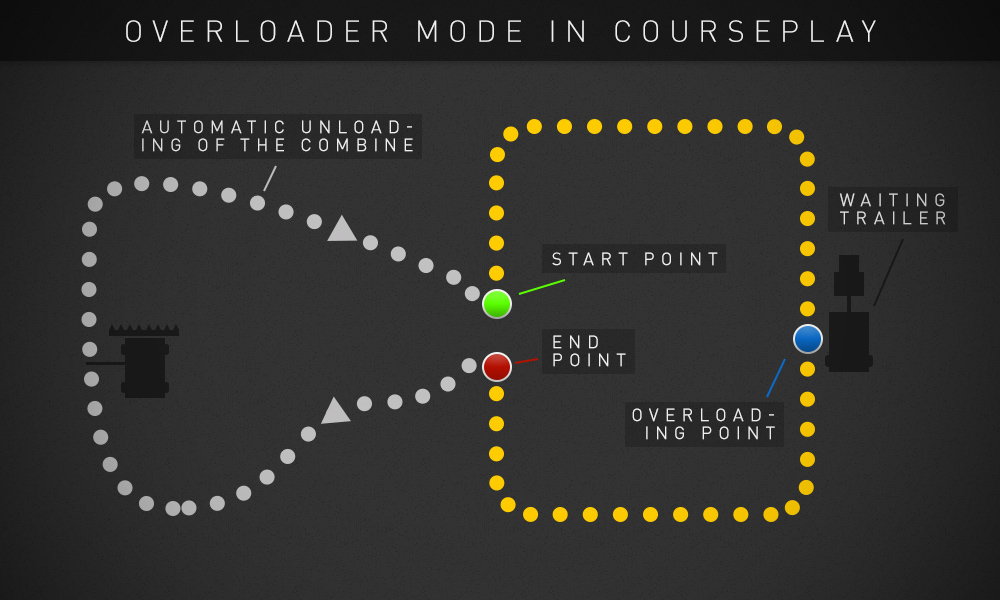
The overloader mode is somewhat similar to the combi mode, in that the driver unloads a combine. But instead of the driving a course to an unloading trigger, the driver overloads into a waiting trailer.
The Course is just as in Combi Mode, but in addition, a waiting point will be placed next to a waiting trailer. Later, while driving the course, this waiting point tells the overloader to stop, extend the pipe, and start overloading, as long as the trailer is not full, and the fillvolume is not lower then drive on at less then X%. During, an info message XYZ has reached overload point. will be displayed. When the overloaders fillvolume is lower then drive on at lower then X% and the trailer is full, the driver will continue the course and wait at the last waypoint for his next unloading operation.
To have a less problematic course, the waypoints before and after the waitpoint should have a straight path to not hit any waiting trailers.
When fertilizing or seeding, there are two sections: one, the actual work part on the field, and two, the course from the field to the refilling trigger and back to the field.
The field work course will be created with the course generator, which can be found on the Drive Controls Page.
The second part, the automatic refilling, is a regular "A to B" course. Just start near the field and then go through the fertilizer/liquid manure/seeding trigger (or under an overloader pipe), and back to the field, ending near the field. As soon as a refilling trigger is recognized, the driver stops and refills automatically. If a tool isn't fillable via a trigger, but rather manually (e.g. a solid manure spreader), an additional waiting point has to be set and the point where the tool should be filled.
To refill your worker, you got to select a fill type that needs to be refilled and you can add up to 2 fill types (e.g. seed and fertilizer).
When driving through a trigger the driver will wait until the tool is filled with the percentage set at your fill type max value (default: 100%).
For refilling at a wait point, the min value should be increase to the value, at where the driver is allowed drive back to work.
To add the refill course, first load the fieldwork course with and then add your refill course with the .
Course example:
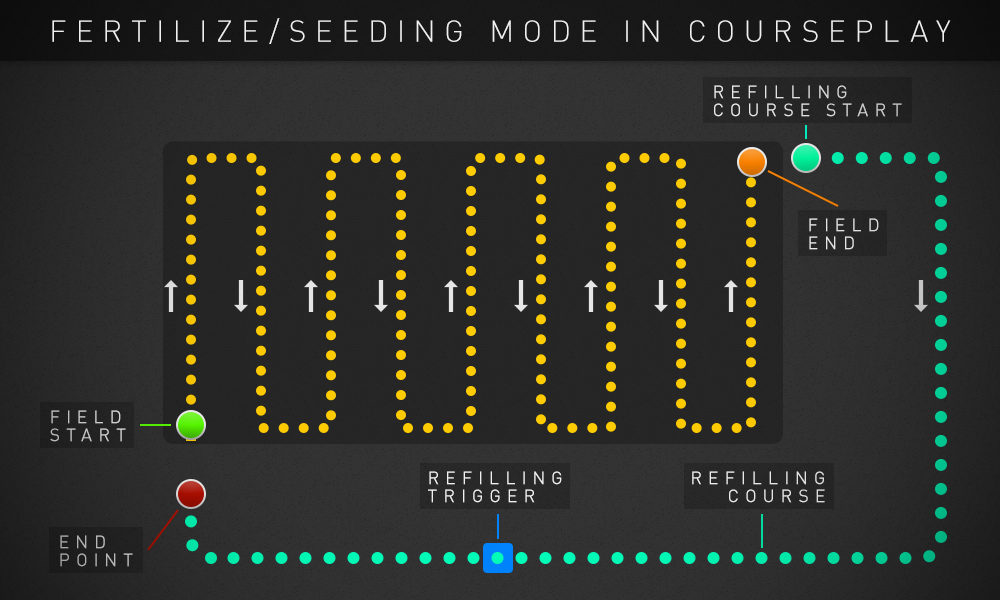
As soon as the tool is empty, it goes into transportation mode and the driver follows the refilling course. Back at the field, the driver drives to the point on the field where it last stopped work, sets the tool into work mode, and continues working.
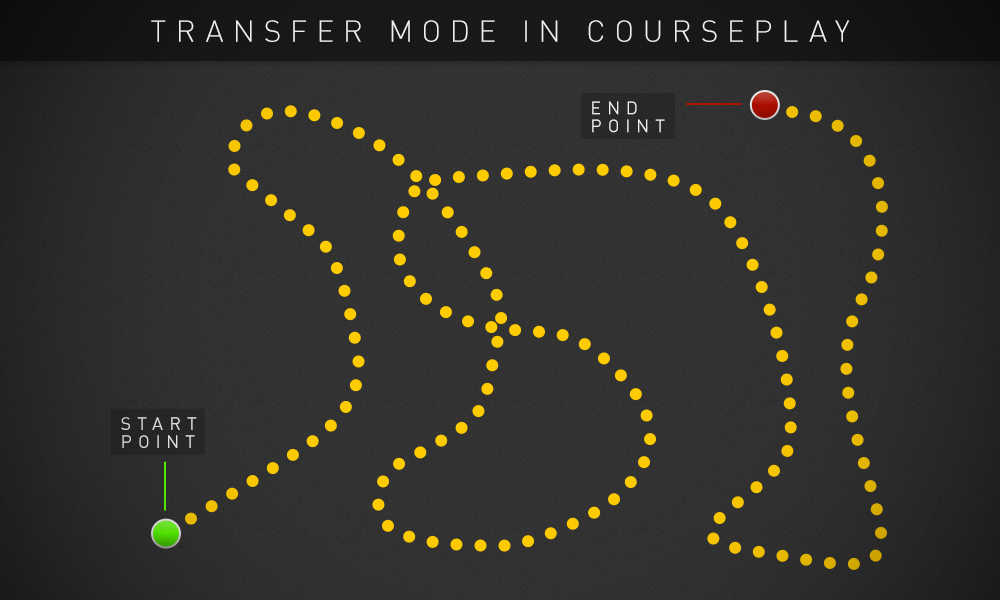
The transfer mode is the most simple form to get from A to B. It uses a completely regular course with a start and an end point. The driver blindly follows that course, without unloading or other fancy stuff and still stop at the last Waypoint.
The field work mode is doing all the other work on the field, like harvesting, cultivation, pressing and collecting bales and so on.
Basically, it works much the same as the fertilizing/seeding mode, only that the tool can/must be emptied/unloaded instead of being refilled.
The field work course will be created with the course generator, which can be found on the Drive Controls Page.
The unload course is similar to the refill course of fertilize and seeding mode, just drive through a unload trigger or silo bunker.
For Unloading combines in a similar way, you just have to load a field work course, turn on 'self unload' and place a trailer that can load the harvested fill type and is on the field or within 20 m of the field edge.
To add the unload course, first load the fieldwork course with and then add your refill course with the
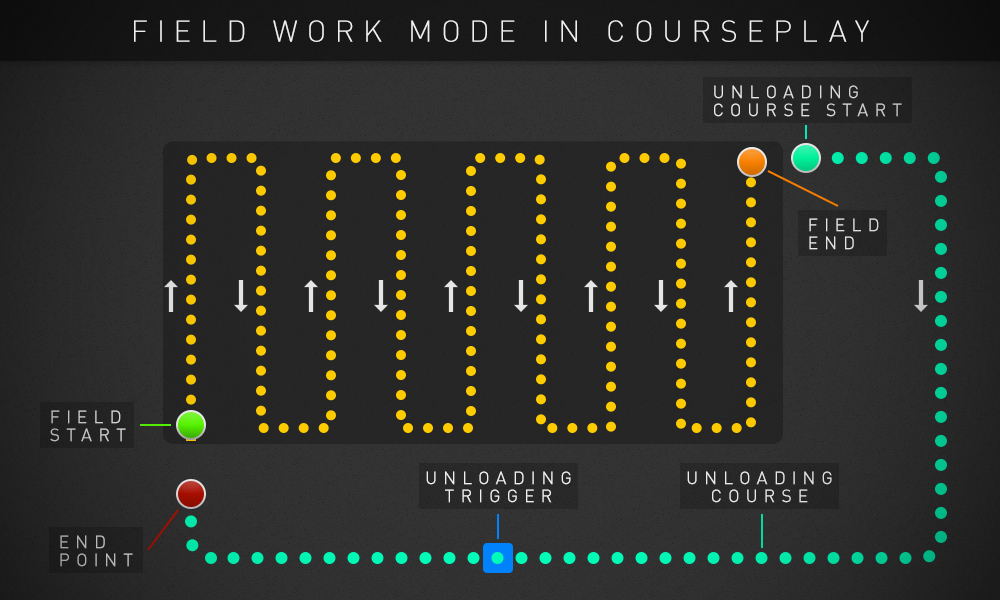
Tools will be (un)folded and (de)activated automatically.
Balers and bale wrapper will stay on field for their work.
To collect bales and unload them where want with an unload course, the unload course must be a bit different. You need to reverse to the place where you want to create a stack and place an 'unload here' waypoint where the 1st stack should be.
The old function of this mode got completely replaced by a simple option called 'self unload' which is use for Harvester and Combine (not Choppers), that can load the harvested fill type and is on the field or within 20 m of the field edge.
The Combine will automatically find its way to the trailer. Just set up a Fieldwork Course and activate the 'self unload' setting.
This mode requiers a course that starts from the field to a place where you want to unload the stack of Bales in reverse (unload here Waypoint at the end of the reverse path) and back to the field.
On the first page, you have to choose the Field, where you want to load the bales.
For Wrapping, as the internal structure of CP always need a course to be started, just do a smal start stop course and just start the driver.
The Field supply mode is for transporting anything that you can bring out on a field, like Seeds or liquid manure. The course basically works like Grain Transport, but in addition, you can place a wait point where the Driver stops and is ready to overload to a e.g. a seeder or liquid manure sprayer.
An Overloader wagon is used for seeds and fertilizer, liqued manure or liqied fertilizer of course require a liquid transport trailer.
This mode lets you fill a shovel in a designated area (e.g. a BGA silo or manure heap) and unload it into a trigger or trailer.
The course setup has to be as follows:
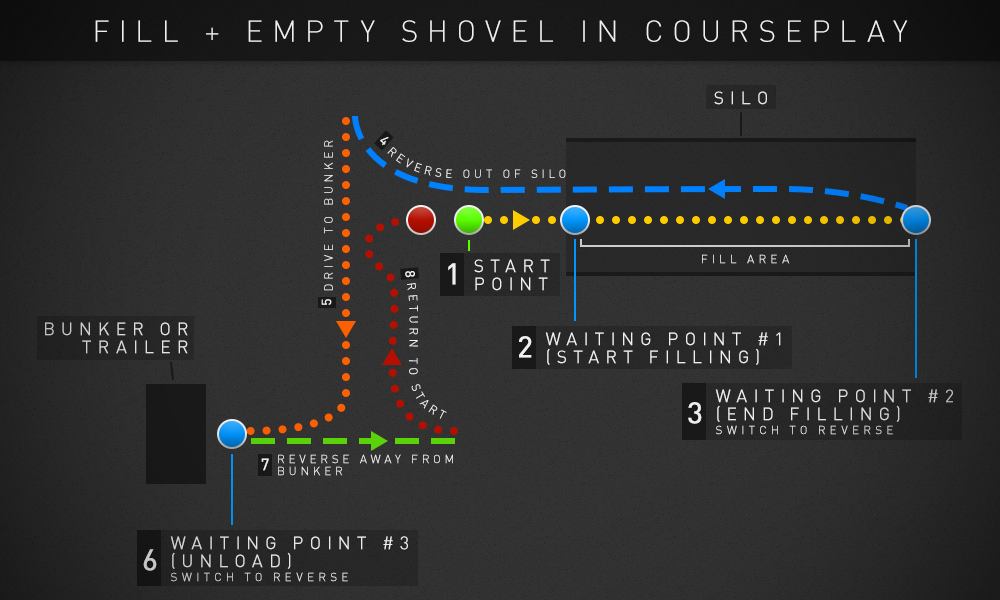
How to record the course (NEW with Version 6.4.0.X):
Start in front of the silo, and drive just inside of the Bunker (only one waypoint will be needed there).
Set the direction to reverse, and reverse back out of the silo (and a bit further).
Set the direction to forwards, and drive to the trigger or trailer that you want to fill. The last 3 or 4 waypoints of that section should be as straight as possible.
About one Vehicle length before the trailer, stop your vehicle, place a waitpoint and set the direction to reverse.
Drive back as straight as possible, set the direction to forwards and drive back to right before the starting point.
Stop the Recording and your course is done.
Before starting the driver, make sure you've set the necessary shovel positions.
When starting the driver, he will drive to waiting point #1 and set the shovel to the loading position (). He will continue until the shovel is full, then stop and set the shovel to the transport position (). He will then switch to the "reverse out of the silo" part of your recording, and continue to drive the recorded course.
Four waypoints before waiting point #3 the driver will set the shovel to the pre-unloading position () and start looking for a trigger or a trailer to unload to. If nothing has been found, the driver will stop. If something has been found, the driver continues until the shovel is ready to unload into the bunker/trailer. The shovel will then be set to the unloading position () and unload.
If filling into a trailer, the trailer does not have to be exactly at/behind waiting point #3, it can in fact be situated slightly in front of it. But, to ensure a perfect procedure, the trailer should be right at your waiting point #3. After unloading, the shovel is set back to the pre-unloading position (); the driver will use the "reverse from bunker/trailer" part of your recording and continue the course from the until it reaches the end point.
A second way of using Mode9 will be loading something out of the trigger.
For this, you got to turn on '' and create a slightly different course.
In addition, a new option will appear on the shovel page to add a fill type, that you want to load.
With Version 6.4.0.X, the course looks just like the normal Mode9 course, but after start, instead of driving into the silo, make sure your shovel in transportposition drives through the loading trigger.
For this mode, there are 3 different options:
build up
leveling
compacting
The course for all 3 options, is the same. With 6.4.0.X the mode will be automatically selected with the attached tool.
You attach your tool at the back of your tractor and drive into the bunker. Stay within the first meter of the bunker, the tool points towards the inside of the bunker.
Start recording the course. The first Waypoint should be inside of the bunker. Drive straight out of the bunker to a save place where you driver can wait for other drivers to unload into the bunker. Place a wait point there and switch to reverse driveing. Then drive in reverse in front of the Bunker and stop the record. That's all.
For the option to build up, you should use a shield, that option is best used in a wedge silo.
For the option compacting, a roller should be used, while leveling can use a shield or a spreader like the Fliegl Duo from ModHub.
The course generator is accessible from the Driver Controls HUD Page, but only on fieldwork or fertilizing/seeding mode.
Keep in mind that some setting combinations, big fields and smal working width can lead into long generation times. Your Game won't simple crash and your computer is not hanging up. Patience is the key to success!
There are several options that will be listed here. To find the best course for you, we suggest you to try different settings. To do that, just change a value and press 'generate course'. If you don't like the result, change an other value and just press 'generate course' again.
The Field can be selected by clicking the arrows, use the scroll wheel, or simply click on the Field on the PDA.
Current loaded course - you can record a round course and save it to use in the course generator, keep in mind that once a course is generated, the current loaded course is no longer your round course.
Scanned Fields from the Map
User generated Fields, by using the calculate current field's path option in the HUD. (The field number will be displayed with a '(User)' in it.
Current vehicle position
South-west/north-west/north-east/south-east corner
Select position on map - this can be done by simply click on the PDA at the position where the start should be
Off - will ignore any islands on the Field
Single - will make a simple round bypass
Circle - will generate a complete circle around the island, which will be driven around completely once
This is useful to prevent turns that will do a reverse maneuver
On odd shaped fields, can lead to visual lines across off field parts, which won't be driven when you have turned on 'use Pathfinder in turns' on the advanced settings page.
This is the only option you need, when you want to use more then one tool on a field
You don't have to add any work width, just set the work width for one tool, the rest will be calculated automatically
Very important note - do not start a multi tool course with headlands in a corner, it will lead to a bad or up to not working at all inner path (explanation picture might follow)
Work tool working width should be already set here
If this is not the case, the yellow button on the right will set the work tool width to the work width setting
Some tools do not send the correct working width, in this case, use the arrows or mouse wheel to adjust to the correct working width manualy
Headland passes (1-50, generator might reduce it to a fitting value)
Headland counter-/clockwise
Start working on (Headland passes / up/down rows) - This setting switches the start with the stop position, keep that in mind if you select a starting position on the map
Headland corner - smooth - will generate a simple smooth corner
Headland corner - turn - will generate a sharp corner with a turn maneuver
Headland corner - round - will generate a round corner, the radius depends on the set turn radius, set on the value setting page on the HUD
Headland overlap (0-20%)
Headland counter-/clockwise
Headland passes (1-50, generator might reduce it to a fitting value)
Start working on (Headland passes / up/down rows) - same as for 'around'
Headland overlap (0-20%)
up/down - simple rows that will be next to each other
racetrack - some kind of spirals which will lead into each other if that makes sense at all, feel free to try it out :)
spiral - the rows will get close to the edge line by line
lands (4- 24) - best for Combines and Harvester with the pipe on the left side, so the pipe is most of its time outside of the fruit
The algorithm calculates the direction of the up/down tracks in the middle automatically. It finds the direction where the number of the generated tracks is the minimum while the field can be covered in a single pass.
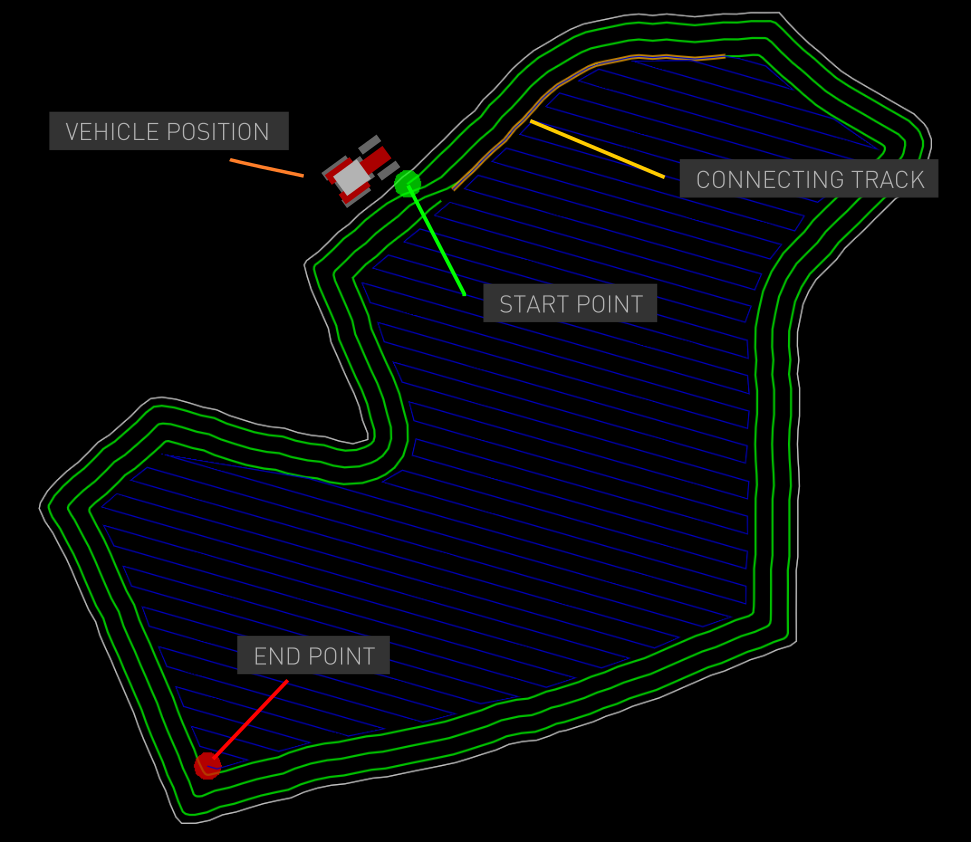
Due to the nature of this automatic alignment, the up/down tracks won't necessarily start where the headland ends, so often, there's a connecting track is needed between the two (see the above picture). The vehicle will raise and turn off implements while traveling on that connecting track.
The Courseplay field scanner scans the map's fields and generates a field edge (field border) path. These edge paths can be used as the basis for a course generation. There's no need to drive around the field manually anymore. The automatic scanner runs on every savegame load and does not save or load the paths. The progress of the scan is displayed.
When you start a new savegame, there will be a dialog where you can activate/deactivate the automatic scan.
The scanner also features a manual scan setting: drive onto the field, and use the corresponding buttons and orders to create and save your custom field edge path. These custom field scans are saved into and loaded from the courseplayFields.xml file. Please see HUD: Drive controls for detailed information.
The field scanner can only scan fields that have a field (cultivated, plowed, seeded) terrain. Meaning: if you've sown grass on a field, it doesn't count as a regular field anymore and the edge points can not be scanned. So if you plan to convert a field to a grass area, make sure to manually scan it first and save the path so you can use it later for generating courses.
There are multiple scanner settings that can be set in the courseplay.xml file (courseplayFields tag).
automaticScan: activate ("true") or deactivate ("false") the automatic scan
onlyScanOwnedFields: if activated ("true"), only the fields that you own are scanned. Also when you buy a new field, it will be scanned immediately. If deactivated ("false"), all fields are scanned.
debugScannedFields: if activated ("true"), debug information concerning the automatic scan will be printed in the log.
debugCustomLoadedFields: if activated ("true"), debug information concerning the manual scan will be printed in the log.
scanStep: determines how detailed the path is going to be. Only change if the developer asks you to.
On some maps, fields are too close together to be scanned correctly. The automatic scanner will most likely stop and/or crash. At the moment there is no viable solution for that problem.
Courseplay can handle reversing with a trailer attached. Both tandem and pivot trailers are supported. Reversing works both with straight and curved routes. This can be especially useful if a tip trigger or unloading point can't be really reached from the front or the sides. Only one trailer is supported, not multiple simultaneously.
Be aware of a couple of regulations when reversing with a trailer:
The tractor will align the trailer according to the next waypoint, so there should be enough lateral space.
The course should be recorded without a trailer attached, so the real intended course is recorded instead of the tractor's steering.
Be aware of the trailer's length; the radius around curves shouldn't be too narrow.
When driving backwards, the tip trigger will be found behind the trailer.
Unloading in silage silos can also be done in reverse. When recording the route, reverse to the backend of the silage bin, place an unload here waypoint and change to forward again and continue the route. Unloading will be done at the last found heap.